
Part 4 of the “Docker for Data Professionals” Series
Welcome to Part 4! You’ve learned Docker fundamentals, built custom images, and orchestrated multi-container environments with Compose. Now it’s time to level up your engineering skills with patterns that separate “it works on my machine” from ‘it works in production”.
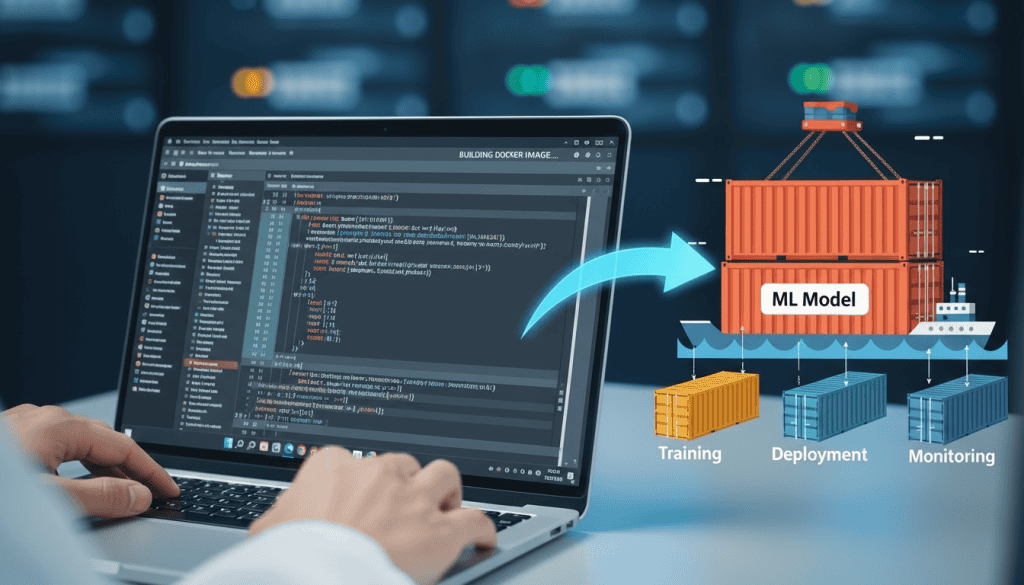
Here’s the reality: your PM doesn’t care that your sentiment analysis model gets 94% accuracy in your Jupyter notebook. They care whether it can handle 1,000 requests per minute without falling over. Today, we’re building things that can ship to production.
You’ll containerize a complete ML model serving GPU, configure GPU support for training jobs, and learn to debug the issues that will inevitably happen. These are the patterns you’ll see in production codebases. Let’s get into it.
Containerizing an ML Model API
Here’s the scenario: you’ve trained a sentiment analysis model in a notebook. It works great. Now your PM wants it deployed as an API so the product team can integrate it. You need to go from research code to production service.
At most companies, a machine learning engineer handles this transition from research to production. But if you’re a data scientist looking to expand your skill set, or you’re at a smaller company where you wear multiple hats, these are the skills that set you apart.
What is the key difference between research code and production code? Your API needs to load the model once at start up (not on every request, because that would be too slow) and serve predictions via HTTP endpoints.
The Setup
We’re building a FastAPI service that handles real traffic. Here’s the project’s structure:
sentiment-api/
├── Dockerfile
├── requirements.txt
├── app.py
├── model.pkl
├── train_model.py
└── .dockerignoreStep 1: Create the API
Start by creating your project folder (I’m calling mine sentiment-api/ but name it whatever makes sense for your project). Inside that folder, create app.py. This is where things shift from research code to production code. We need proper error handling so one bad request doesn’t crash the entire service. We need logging so you can debug issues in production. And we need health checks so container orchestrators like Kubernetes know if your service is actually working.
app.py
from fastapi import FastAPI
from pydantic import BaseModel
import joblib
import logging

# Configure logging so Docker can capture it properly
logging.basicConfig(level=logging.INFO)
logger = logging.getLogger(__name__)

# Load model once at startup, not on every request
logger.info("Loading model...")
model = joblib.load("model.pkl")
logger.info("Model loaded successfully!")

app = FastAPI()

class PredictionRequest(BaseModel):
    text: str

class PredictionResponse(BaseModel):
    sentiment: str
    confidence: float

@app.get("/health")
def health_check():
    """Health endpoint for container orchestration"""
    return {"status": "healthy"}

@app.post("/predict", response_model=PredictionResponse)
def predict(request: PredictionRequest):
    """Make a prediction on the input text"""
    try:
        prediction = model.predict([request.text])[0]
        proba = model.predict_proba([request.text])[0]
        confidence = float(max(proba))

        logger.info(f"Prediction made with confidence: {confidence:.2f}")

        return PredictionResponse(
            sentiment=prediction,
            confidence=confidence
        )
    except Exception as e:
        logger.error(f"Prediction failed: {str(e)}")
raiserequirements.txt
fastapi==0.104.1
uvicorn==0.24.0
joblib==1.3.2
scikit-learn==1.3.2
pydantic==2.5.0Step 1.2: Create and Train a Model
If you don’t already have a model to containerize, you can use my script to create a model for you and serialize that trained model as a pickle file.
train_model.py
from sklearn.feature_extraction.text import TfidfVectorizer
from sklearn.linear_model import LogisticRegression
from sklearn.pipeline import Pipeline
from sklearn.model_selection import train_test_split
from sklearn.metrics import accuracy_score, classification_report
import joblib
import numpy as np

sample_texts = [
    "I love this product! It's amazing and works great.",
    "This is the best thing I've ever bought. Highly recommend!",
    "Excellent quality and fast shipping. Very satisfied.",
    "Great service and fantastic product. Will buy again!",
    "Outstanding experience from start to finish.",
    "Really impressed with the quality and value.",
    "Exceeded my expectations in every way!",
    "Perfect! Exactly what I was looking for.",
    "Terrible product. Complete waste of money.",
    "Very disappointed. Does not work as advertised.",
    "Poor quality and terrible customer service.",
    "Horrible experience. Would not recommend to anyone.",
    "Broke after one day of use. Very frustrating.",
    "Not worth the price. Many better options available.",
    "Completely useless. Returning immediately.",
    "Worst purchase I've ever made. Stay away!",
    "It's okay, nothing special but does the job.",
    "Average product, neither good nor bad.",
    "Decent quality for the price, but nothing extraordinary.",
    "Works as expected, no complaints but not impressed either.",
]

sample_labels = [
    "positive", "positive", "positive", "positive",
    "positive", "positive", "positive", "positive",
    "negative", "negative", "negative", "negative",
    "negative", "negative", "negative", "negative",
    "neutral", "neutral", "neutral", "neutral"
]

texts_extended = sample_texts * 25
labels_extended = sample_labels * 25

for variation in range(50):
    texts_extended.extend([
        f"Amazing product! Love it so much. Variation {variation}",
        f"Excellent quality and design. Worth every penny! Version {variation}",
        f"Terrible experience. Very disappointed. Case {variation}",
        f"Worst product ever. Do not buy! Instance {variation}",
        f"It's fine, nothing special. Variant {variation}",
        f"Okay product, average quality. Sample {variation}",
    ])
    labels_extended.extend(["positive", "positive", "negative", "negative", "neutral", "neutral"])

X_train, X_test, y_train, y_test = train_test_split(
    texts_extended, labels_extended, test_size=0.2, random_state=42, stratify=labels_extended
)

pipeline = Pipeline([
    ('tfidf', TfidfVectorizer(max_features=500, ngram_range=(1, 2))),
    ('classifier', LogisticRegression(random_state=42, max_iter=1000))
])

print("Training sentiment analysis model...")
pipeline.fit(X_train, y_train)

y_pred = pipeline.predict(X_test)
accuracy = accuracy_score(y_test, y_pred)
print(f"\nModel Accuracy: {accuracy:.2%}")
print("\nClassification Report:")
print(classification_report(y_test, y_pred))

joblib.dump(pipeline, 'model.pkl')
print("\nModel saved as 'model.pkl'")

test_sentences = [
    "This is absolutely wonderful!",
    "I hate this so much.",
    "It's okay, I guess.",
]

print("\n" + "="*50)
print("Testing the model with new sentences:")
print("="*50)
for sentence in test_sentences:
    prediction = pipeline.predict([sentence])[0]
    proba = pipeline.predict_proba([sentence])[0]
    confidence = max(proba)
    print(f"\nText: '{sentence}'")
print(f"Prediction: {prediction} (confidence: {confidence:.2%})")Step 2: Create a Production-Grade Dockerfile
Here’s where we level up from Part 3. This Dockerfile uses multi-stage builds to create smaller, more secure images.
Dockerfile
# Stage 1: Builder
FROM python:3.11-slim as builder

WORKDIR /app

# Install dependencies in a separate stage
COPY requirements.txt .
RUN pip install --no-cache-dir --user -r requirements.txt

# Stage 2: Runtime
FROM python:3.11-slim

# Create non-root user for security
RUN useradd -m -u 1000 apiuser

WORKDIR /app

# Copy only the dependencies from builder
COPY --from=builder /root/.local /home/apiuser/.local

# Copy application code
COPY app.py model.pkl ./

# Make sure scripts are in PATH
ENV PATH=/home/apiuser/.local/bin:$PATH

# Switch to non-root user
USER apiuser

# Expose port
EXPOSE 8000

# Health check (orchestrators use this!)
HEALTHCHECK --interval=30s --timeout=3s --start-period=5s --retries=3 \
    CMD python -c "import requests; requests.get('http://localhost:8000/health')" || exit 1

# Run the application
CMD ["uvicorn", "app:app", "--host", "0.0.0.0", "--port", "8000"]
Why Use This Approach?
With multi-stage builds, we can install dependencies during the builder stage, then copy only what we need to the runtime stage. Your final image ends up substantially smaller, which means faster deployments and lower storage costs.
Running as a non-root user is a security requirement at most companies. If someone exploits your container, they don’t get root access to potentially escape the container or access the host system.
The health check tells orchestrators whether your container is actually working or not. If it fails three times in a row, the orchestrator knows to restart your container automatically.
We’re using Python’s logging module instead of print statements because Docker captures logs properly this way. You’ll be able to search and filter them in CloudWatch, Datadog, or whichever logging system your company uses.
The --no-cache-dir flag in pip keeps the image smaller by not storing downloaded packages.
Step 3: Add a .dockerignore
This works like .gitignore, but for Docker. It prevents unnecessary files from bloating your image or accidentally including sensitive data.
.dockerignore
__pycache__/
*.pyc
*.pyo
*.pyd
.Python
*.so
*.egg
*.egg-info/
dist/
build/
.git/
.gitignore
.vscode/
.idea/
*.ipynb
.ipynb_checkpoints/
README.md
tests/Step 4: Build and Run
# Build the image
docker build -t sentiment-api:v1.0.0 .

# Run it
docker run -p 8324:8000 sentiment-api:v1.0.0

# Test it
curl -X POST http://localhost:8324/predict \
  -H "Content-Type: application/json" \
-d '{"text": "This movie was amazing!"}'– Mac/Linux:
lsof -i :5000
– Windows:
netstat -ano | findstr :5000
After running the curl command, you should get back:
{
  "sentiment": "positive",
  "confidence": 0.8150972762233741
}🎉 That’s it! You just containerized a production ML API. This same container will run identically on your laptop, in AWS, in GCP, on Azure, pretty much anywhere Docker runs. If it works locally, it’ll work in production (assuming you didn’t hardcode anything 😬🤞🏾).
GPU Support for Deep Learning
If you’re training deep learning models, you need GPUs. Here’s how to actually use them in Docker without fighting with CUDA installations.
Unfortunately, the NVIDIA Container Toolkit is specific to Linux and does not work on macOS. If you are running Docker on a Mac, the containers will not have direct access to the GPU. If you need GPU-accelerated containers, you’ll need to run them on a Linux machine with an NVIDIA GPU (like a cloud instance or dedicated Linux box).
If you’re using Windows, there is a solution. WSL2, which stands for Windows Subsystem for Linux. The Windows machine also needs NVIDIA GPUs with recent drivers installed on it. Windows facilitates GPU access to Docker containers through WSL2. Docker Desktop automatically manages GPU passthrough via WSL2.
Prerequisites
On your host machine:
- NVIDIA GPU with recent drivers
- NVIDIA Container Toolkit installed.
The code snippet below is a bash script for installing the NVIDIA Container Toolkit on Ubuntu. This allows Docker containers to access NVIDIA GPUs, and it’s needed for running GPU-accelerated applications in Docker.
You can also read the docs on installing the toolkit.
# Install on Ubuntu (check NVIDIA docs for other systems)
curl -fsSL https://nvidia.github.io/libnvidia-container/gpgkey | \
  sudo gpg --dearmor -o /usr/share/keyrings/nvidia-container-toolkit-keyring.gpg

curl -s -L https://nvidia.github.io/libnvidia-container/stable/deb/nvidia-container-toolkit.list | \
  sed 's#deb https://#deb [signed-by=/usr/share/keyrings/nvidia-container-toolkit-keyring.gpg] https://#g' | \
  sudo tee /etc/apt/sources.list.d/nvidia-container-toolkit.list

sudo apt-get update
sudo apt-get install -y nvidia-container-toolkit
sudo nvidia-ctk runtime configure --runtime=docker
sudo systemctl restart dockerDockerfile for GPU Training
We’ll start with NVIDIA’s official CUDA base images. Don’t try to install CUDA yourself, unless you want to waste hours debugging driver mismatches and other cryptic issues…ask me how I know 🙃.
Dockerfile.gpu
# Start with NVIDIA's CUDA base image
FROM nvidia/cuda:12.1.0-cudnn8-runtime-ubuntu22.04

# Install Python
RUN apt-get update && apt-get install -y \
    python3.11 \
    python3-pip \
    && rm -rf /var/lib/apt/lists/*

WORKDIR /workspace

# Install PyTorch with CUDA support
COPY requirements-gpu.txt .
RUN pip3 install --no-cache-dir --upgrade pip && \
    pip3 install --no-cache-dir torch==2.1.0+cu121 torchvision==0.16.0+cu121 --index-url https://download.pytorch.org/whl/cu121 && \
    pip3 install --no-cache-dir transformers==4.35.0 accelerate==0.24.0

# Copy training script
COPY train_model.py .

CMD ["python3", "train_model.py"]requirements-gpu.txt
torch==2.1.0+cu121
torchvision==0.16.0+cu121
transformers==4.35.0
accelerate==0.24.0Notice we’re installing PyTorch with CUDA 12.1 support (+cu121). The version needs to match your base image’s CUDA version; otherwise, PyTorch won’t see your GPUs.
Running with GPU Access
# Build GPU image
docker build -f Dockerfile.gpu -t pytorch-trainer:gpu .

# Run with GPU access
docker run --gpus all \
  -v $(pwd)/data:/workspace/data \
  -v $(pwd)/models:/workspace/models \
pytorch-trainer:gpuThe --gpus all flag gives the container access to all your GPUs. You can also choose which GPUs to use if you’re sharing a multi-GPU machine.
# Use only GPU 0
docker run --gpus '"device=0"' pytorch-trainer:gpu

# Use GPUs 0 and 1
docker run --gpus '"device=0,1"' pytorch-trainer:gpuGPU in Docker Compose
docker-compose.gpu.yml
version: '3.8'

services:
  trainer:
    build:
      context: .
      dockerfile: Dockerfile.gpu
    volumes:
      - ./data:/workspace/data
      - ./models:/workspace/models
      - ./logs:/workspace/logs
    deploy:
      resources:
        reservations:
          devices:
            - driver: nvidia
              count: all  # or specific count
capabilities: [gpu]Now we run it.
docker-compose -f docker-compose.gpu.yml upYou should always verify GPU access before starting a long training run.
docker run --gpus all pytorch-trainer:gpu python3 -c "import torch; print(torch.cuda.is_available())"If it prints True, you’re good to go. If it prints False, you’ve got a configuration problem to debug before wasting hours on GPU training.
Debugging Common Problems
Everyone has seen an error pop-up before. I’ve seen far too many. Here are some issues I’ve come across and how I’ve handled them 😤.
❗️ 1: Container Exits Immediately
Symptom: You run docker run my-app:v1.0.0 and it exits away with no obvious error.
How to Debug It
# Check the logs first
docker logs <container-id>

# Or run with --rm to see output immediately
docker run --rm my-app:v1.0.0Common Causes and Fixes
1. The application crashed on startup.
This is usually a Python import error or a missing file. The logs will tell you exactly what failed.
Common Culprits
- Import fails because a dependency isn’t installed
- File path is wrong (remember, paths are relative to
WORKDIR) - An environment variable is missing
2: No long-running process
Your container needs a process that stays running. If your CMD finishes quickly, the container exits.
# dockerfile

# Bad - exits immediately after training finishes
CMD ["python", "train.py"]

# Good - stays running
CMD ["uvicorn", "app:app", "--host", "0.0.0.0"]If you need to run a one-off training job, that’s fine, the container should exit when it’s done. Just make sure you’re mounting volumes to save your outputs.
3. Wrong working directory
# dockerfile

WORKDIR /app
COPY app.py .
# Make sure CMD can actually find app.py at /app/app.py❗️ 2: Import Errors Inside the Container
Symptom: ModuleNotFoundError: No module named 'some_package' even though the package is clearly in the requirements.txt file 🙄.
How to Debug It
# Get a shell in the running container
docker exec -it <container-id> bash

# Or if container keeps exiting, override the entrypoint
docker run -it --entrypoint bash my-app:v1.0.0

# Inside container, try importing
python -c "import problematic_module"Common Causes and Fixes
1. Wrong base image
If you’re using python:3.11-slim, you’re missing a lot of system libraries. Some Python packages need to compile C extensions and will fail if those extensions are not included.
# dockerfile

# If you need packages that compile C extensions
FROM python:3.11  # Full image, not slim

# Or install what you need
FROM python:3.11-slim
RUN apt-get update && apt-get install -y \
    gcc \
    python3-dev \
&& rm -rf /var/lib/apt/lists/*2. Requirements might not be installed
Check your layer order. Docker executes commands sequentially.
# dockerfile

# Good - requirements installed before copying code
COPY requirements.txt .
RUN pip install -r requirements.txt
COPY . .

# Bad - requirements copied but never installed
COPY . .
# You forgot RUN pip install!3. Virtual environment confusion
Don’t use venv inside containers. Your container is already isolated from the host system; that’s the whole point of Docker.
# dockerfile

# Don't do this
RUN python -m venv venv
RUN source venv/bin/activate  # This won't persist to the next layer!

# Just install directly
RUN pip install -r requirements.txt❗️ 3: Can’t Connect to Services
Symptom: Your Jupyter container can’t reach PostgreSQL even though both containers are running.
How to Debug It
# Check if containers are on the same network
docker network ls
docker inspect <container-id> | grep NetworkMode

# Check if the service is actually running
docker-compose logs postgres
docker-compose logs jupyterCommon Mistakes and Fixes
😈 Using localhost instead of service name
This is the most common networking mistake. Inside a container, localhost refers to that container, not your host machine.
# Wrong - localhost is the container itself
engine = create_engine('postgresql://user:pass@localhost:5432/db')

# Right - use the service name from docker-compose.yml
engine = create_engine('postgresql://user:pass@postgres:5432/db')Docker Compose creates a network where services can find each other by name. If your service is called postgres in the Compose file, that’s its hostname.
😈 Services not on the same network
# Both services must be in the same compose file
# OR explicitly connected to the same network
services:
  app:
    networks:
      - my-network
  db:
    networks:
      - my-network

networks:
my-network:😈 Service not ready yet
Remember from Part 3? The depends_on option doesn’t wait for the service to be ready; it waits for the container to start.
# Add retry logic in your application code
import time
from sqlalchemy import create_engine

for attempt in range(5):
    try:
        engine = create_engine(DATABASE_URL)
        engine.connect()
        break
    except Exception as e:
        if attempt < 4:
            print(f"Database not ready, retrying... ({attempt + 1}/5)")
            time.sleep(2)
        else:
raise❗️ 4: Running Out of Disk Space
Symptom: docker build fails with “no space left on device” even though you swear you have space.
Docker images pile up fast, especially if you’re iterating on builds. Each failed build leaves behind layers.
Check what’s using space
# Overview
docker system df

# Detailed breakdown
docker system df -vClean up using these commands
# Remove stopped containers
docker container prune

# Remove unused images
docker image prune

# Remove unused volumes (be careful with this one)
docker volume prune

# Remove everything not currently in use
docker system prune -aKeep your images lean in your Dockerfile
# Clean up in the same layer to reduce image size
RUN apt-get update && \
    apt-get install -y package && \
    apt-get clean && \
    rm -rf /var/lib/apt/lists/*

# Use --no-cache-dir with pip
RUN pip install --no-cache-dir -r requirements.txtEach RUN command creates a new layer. If you install something in one layer and delete it in another, both layers still exist in the final image. Clean up the same RUN command.
I have a cron job that runs docker system prune -f every Sunday night. Keeps things manageable without me thinking about it.
❗️ 5: Slow Build Times
Symptom: docker build takes forever, especially the pip install step. You change one line of code and have to wait 5 minutes for a rebuild.
Fix it with Better Layer Ordering
Docker caches layers. If a layer hasn’t changed, Docker reuses the cached version. The trick is putting things that change rarely at the top and things that change frequently at the bottom.
# dockerfile

# Good - requirements rarely change, so this layer stays cached
COPY requirements.txt .
RUN pip install -r requirements.txt
COPY . .  # Code changes don't invalidate the pip cache

# Bad - every code change reinstalls everything
COPY . .
RUN pip install -r requirements.txtUse BuildKit
Docker’s new build engine is significantly faster. Enable it once and forget about it.
# One-time for a build
DOCKER_BUILDKIT=1 docker build -t my-app:v1.0.0 .

# Make it default (add to ~/.bashrc or ~/.zshrc)
export DOCKER_BUILDKIT=1Cache pip Downloads During Build
This is more advanced, but if you’re rebuilding frequently, try the command below.
# dockerfile

# Mount pip cache during build
RUN --mount=type=cache,target=/root/.cache/pip \
pip install -r requirements.txtUse a More Specific Base Image
Instead of starting from scratch every time, try this.
# dockerfile

# Instead of generic Python
FROM python:3.11-slim

# Use an image with common ML packages pre-installed
FROM continuumio/miniconda3:25.3.1-1Production Readiness Checklist 📋
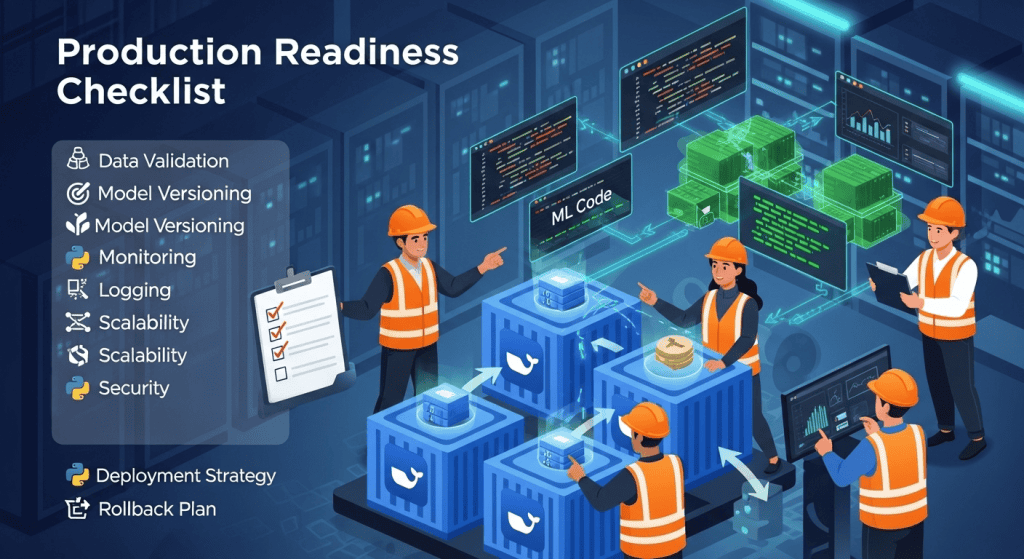
Before deploying to production, walk through this checklist to save you future hassle.
Security
- Running as a non-root user
- No secrets hardcoded in Dockerfile or code (use environment variables or secrets management)
- Using specific version tags, not
latest - Scanned image for vulnerabilities (use tools like Trivy or Snyk)
- Use minimal base image (slim or alpine variants when possible)
Reliability
- Health check configured properly
- Proper logging with appropriate levels (not just print statements)
- Graceful shutdown handling for long-running processes
- Set resource limits (prevents one container from eating all CPU/memory)
- Have retry logic for external dependencies (databases, APIs)
Performance
- Multi-stage build reducing final image size
- Layers ordered for maximum cache efficiency
- No unnecessary files in image (check .dockerignore)
- Model loaded once at startup, not per request
- Connection pooling for database connections
Observability
- Application metrics exposed (e.g., response times, error rates)
- Logs structured in JSON format for easy parsing
- Error tracking configured (use Sentry, Rollbar, etc.)
- Health endpoint responds in under 1 second
- Version and build info included in logs
Congratulations! You just:
- Built production-ready ML APIs with proper error handling and logging
- Used multi-stage builds to create smaller, more secure images
- Configured GPU access for deep learning training
- Learned debugging patterns for common Docker issues
Homework 📚

Exercise 1: Build Your Own API
Take one of your ML models (it doesn’t have to be a complex model) and containerize it with FastAPI. Add health checks, proper logging, and run it as a non-root user. Make sure to test error handling by intentionally sending bad inputs.
Exercise 2: Break Things on Purpose
Create a Dockerfile with wrong dependencies. Use localhost instead of service names in a Compose file. Practice debugging with docker logs and docker exec. The goal is to see these errors in a safe environment so you recognize them instantly when they inevitably happen in production.
Exercise 3: Optimize for Speed
Take an existing Dockerfile and measure the build time. Reorder the layers for better caching. Add multi-stage builds. Enable BuildKit. Measure again. You should be able to cut build time by at least 50%.
In Part 5, we’re covering production deployment. Container registries (Docker Hub, ECR, GHCR), security scanning, orchestration platforms (Kubernetes, ECS), and CI/CD pipelines. This is the final piece you need to understand how to confidently deploy containers to production.
Want the quick command reference? Grab the Docker for Data Professionals Cheat Sheet to keep these commands handy!
Remember: Four parts ago, you were learning what containers even are. Now you’re building production-grade ML APIs with multi-stage builds, configuring GPU support, and debugging issues systematically. That’s significant progress. Happy coding 👍🏾.