

I’ve been obsessed with text-to-speech systems lately. Every time I hear a screen reader or an audiobook with synthesized narration, I can’t help but think about the engineering that went into building that TTS system.
I built my first TTS serving platform during a company hackathon. The requirements seemed straightforward: accept text input, return audio in various formats, and let admins add voice samples for cloning (where the model learns to mimic someone’s voice from a short audio clip).
But building a framework that actually handles production traffic taught me that audio APIs need different patterns than text-based systems.
Working with audio changes your API design because you’re dealing with binary data instead of text. File sizes directly affect your bandwidth costs. Users notice delays with audio differently than with text. A 500ms delay for text generation feels fine, but the same delay before audio plays feels broken. You’ll need to think about streaming, caching, and format conversions in ways you probably haven’t if you’re coming from text APIs.
This post walks through building a complete TTS serving system from scratch. I’ll cover audio encoding, HTTP streaming for progressive playback, and the engineering patterns for serving compute-intensive models. These patterns apply beyond TTS. I’ve used similar approaches for image generation APIs.
What You Should Know Before Starting
You should be comfortable with Python, REST APIs, and making HTTP requests. Basic knowledge of neural networks helps but isn’t required. I’ll explain the audio fundamentals and binary data handling you need as we go. I promise it’s not as intimidating as it seems 😉.
Why TTS Feels Different Than Text Generation
I’ve worked with both LLMs and TTS models over the past year, and they feel completely different to work with. With LLMs, you generate discrete tokens that you can count and measure with metrics. The output is text – you can print it, analyze it with regex, or store it in a database easily.
TTS generates continuous audio waveforms. You can’t just run BLEU scores and call it done. The output is binary data that needs special handling.
Quality is subjective too, which makes evaluation tricky. What sounds natural to me might sound robotic to you 🎤🤖.
File size becomes a concern too. Ten seconds of WAV audio is 1.6MB. The same audio as MP3 might be only 80KB. Your choice of audio format directly impacts bandwidth costs and user experience.
Audio Fundamentals 🔉
Before we build anything, you need to understand how audio works. I know it sounds dry, but trust me, understanding these basics will save you hours of debugging weird audio issues later.
Sample Rate
Sample rate measures how many samples per second your audio contains. Think of it like the frame rate of a video – more samples mean more detail, but also larger files.
Common sample rates you’ll encounter:
- 44.1kHz (CD quality) – Standard for music, but overkill for speech
- 22.05kHz (good for speech) – Sweet spot for TTS quality vs file size
- 16kHz (acceptable for speech) – Minimum for decent speech quality
- 8kHz (phone quality) – You’ll recognize this as “that phone voice quality”
The Nyquist theorem says your sample rate must be at least twice the highest frequency you want to capture. Human speech tops out around 8kHz, which is why 16kHz sampling captures everything you need for speech. Music goes much higher (up to 20kHz for human hearing), which is why music uses 44.1kHz.
For TTS specifically, I recommend 22.05kHz. Going 44.1kHz doesn’t improve quality because speech just doesn’t have those higher frequencies. You’re literally wasting storage and bandwidth.
Bit Depth
Bit depth determines how many bits represent each sample. This is like color depth in images – more bits mean more precision.
Common bit depths:
- 8-bit – Sound terrible, only use for prototyping
- 16-bit – Standard for speech, gives you 96dB of dynamic range
- 24-bit – Used for professional audio recording, overkill for TTS
16-bit is standard for speech. You get 96dB of dynamic range, which is way more than enough for human speech (normal conversation is around 60dB). Going to 24-bit doesn’t help TTS at all.
Channels
Audio can be mono (one channel) or stereo (two channels). TTS is almost always mono because speech doesn’t need stereo imaging. Think about it – when someone talks to you, you don’t need them in surround sound.
Stereo doubles your file size for zero benefit in TTS applications. The only exception is if you’re doing something creative like placing different speakers in different channels, but that’s pretty niche.
Audio Formats
This is where things get practical. You need to understand these formats because you’ll use different ones at different stages of your pipeline.
WAV (Uncompressed)
WAV stores raw PCM (pulse-code modulation) data with RIFF header. It’s universal, maintains perfect quality, but the files are massive! One minute of 16-bit, 44.1kHz mono audio is 5.3MB. For a typical audiobook chapter (20 minutes), that’s over 100MB uncompressed.
I use WAV for:
- Intermediate processing in my pipeline
- Debugging audio quality issues
- Archival storage when quality matters most
When you’re manipulating audio (resampling, normalizing, etc.), always work with WAV. The last thing you want is to lose quality at each processing step through multiple lossy compressions.
MP3 (Lossy Compression)
MP3 uses “lossy” compression, meaning it permanently throws away data to shrink files. The codec (the algorithm that encodes and decodes audio) uses psychoacoustic models to figure out what to remove. It analyzes which frequencies humans can’t hear or won’t notice because they’re masked by other sounds, then discards them. Pretty clever.
MP3 compression is dramatic. A one-minute audio clip that’s 5MB as WAV becomes 500KB as MP3. When you’re serving thousands of audio clips, that 10x reduction in file size directly impacts your bandwidth costs.
The tradeoff is quality degradation. Each encode/decode cycle loses some information. This is why you should never edit an MP3 directly – always decompress to WAV first, edit, then re-encode. But for delivering audio to user over the internet, MP3 works well.
Opus (Modern Lossy)
Opus is the newer codec and it’s legitimately better than MP3 at the same bitrate. It’s a hybrid codec optimized for both speech and music. Lower latency (important for real-time), better quality at low bitrates, and it’s an open standard (no licensing fees).
The catch? Slightly less universal browser support than MP3. Safari only added full support relatively recently. For WebRTC or real-time streaming applications, Opus is excellent. For broader compatibility across all browsers and devices, MP3 still wins.
My rule of thumb: Use MP3 for maximum compatibility, use Opus if you’re targeting modern browsers or need real-time capabilities.
Working With Audio in Python
Here’s how you load and manipulate audio in Python. I’ll walk through each line.
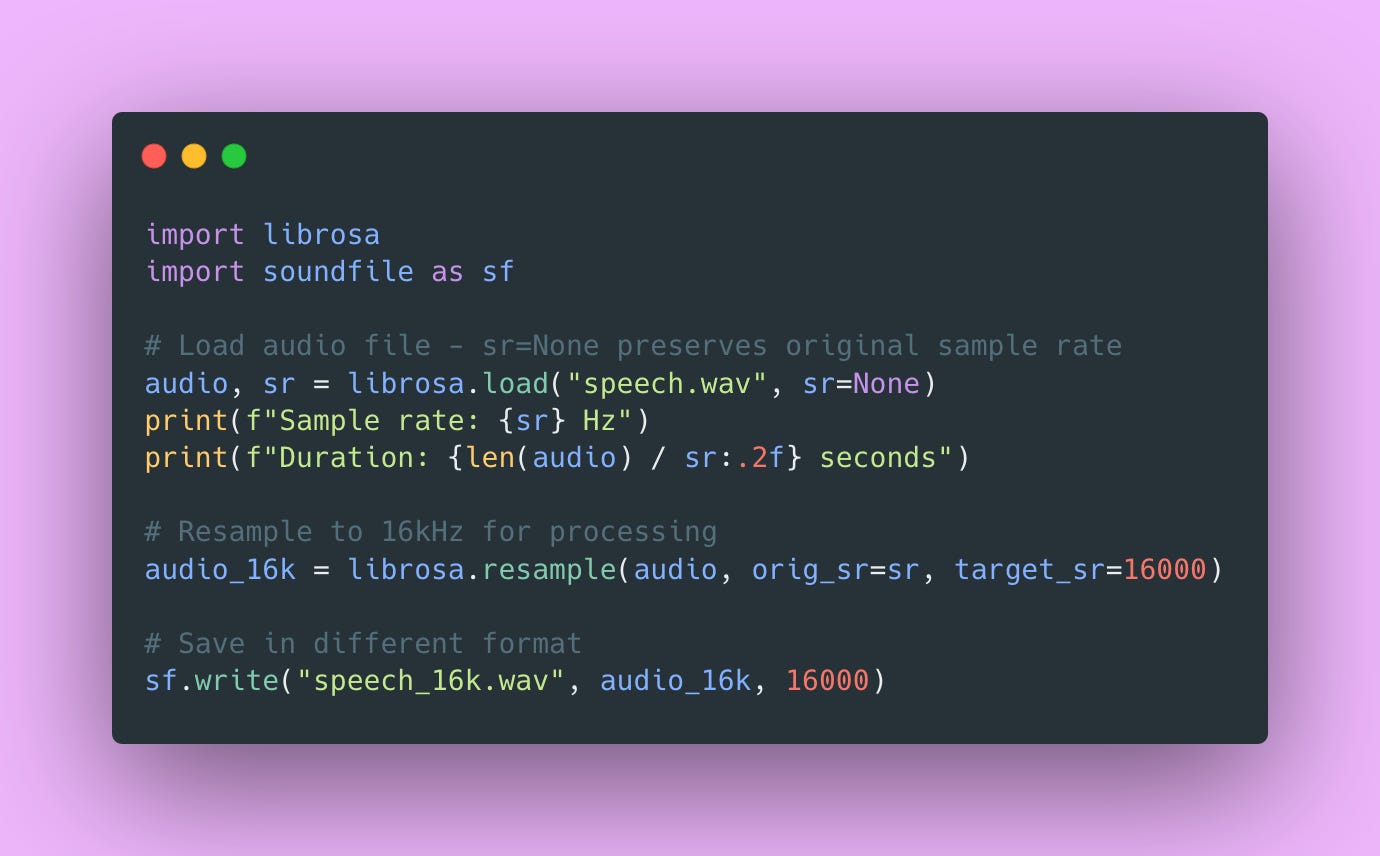
Audio is just a Numpy array! Each element is a sample value (usually a float between -1.0 and 1.0), and the sample rate determines how those samples map to time. It’s actually pretty straightforward once you realize it’s just an array of numbers.
The sr=None parameter in librosa.load() is important. It preserves the original sample rate. If you omit it, librosa defaults to 22050Hz and resamples your audio automatically, which might not be what you want.
Choosing Your TTS Model
Model selection is crucial and involves trade-offs between quality, speed, voice variety, and infrastructure requirements. High-quality models are generally slower. More voices mean larger model downloads. Voice cloning adds significant complexity.
I’ve tested most of the popular open-source options. Here’s my assessment of each:
Coqui XTTS v2: This is what I’m using in production. Multi-lingual support (17+ languages), supports voice cloning, model size is around 2GB. You need at least 4GB+ VRAM. The quality is solid, not quite ElevenLabs level, but close enough for most applications. Generation speed is about 1-2 seconds for a typical sentence on a T4 GPU.
Bark: Highly expressive and can generate music and sound effects, which is pretty cool. But it’s significantly slower than XTTS (sometimes 5-10 seconds or a single sentence). Great for creative applications where you need those extra sound effects, but not practical for real-time or high-throughput scenarios.
Piper: Fast CPU inference, multiple voices out of the box, but limited customization options. This is excellent if you don’t have GPU infrastructure or need something lightweight. Quality is decent but not amazing. I use this for dev environments where I don’t want to spin up GPU instances.
StyleTTS2: High quality with voice cloning capability, moderate speed. It requires more ML knowledge to tune properly though. If you’re comfortable with model training and fine-tuning, this gives you more control. But the learning curve is steeper.
For this tutorial, I’m using Coqui XTTS v2. It hits the sweet spot of quality, speed, and voice cloning capability. The model needs 4GB+ VRAM and supports voice cloning with just 6-30 second samples (which is impressively short). XTTS is licensed under Mozilla Public License 2.0, so you can use it commercially without licensing headaches.
Our Project Structure
Here’s how I organize TTS projects. Don’t come for me 🫣.
tts-api/
├── server/
│   ├── __init__.py
│   ├── main.py          # FastAPI application
│   ├── model.py         # TTS model loading and inference
│   ├── audio.py         # Audio processing utilities
│   ├── storage.py       # File storage management
│   ├── schemas.py       # Pydantic validation models
│   └── config.py        # Configuration
├── client/
│   └── client.py        # Python client library
├── storage/
│   ├── voices/          # Voice sample storage
│   └── generated/       # Generated audio cache
├── tests/
│   ├── test_audio.py
│   ├── test_api.py
│   └── test_integration.py
├── requirements.txt
├── .env
└── README.md
This structure separates concerns cleanly. Audio processing lives in audio.py, model inference in model.py, storage management in storage.py. FastAPI handles HTTP in main.py, Pydantic validates inputs in schemas.py, and the client library in client/ provides a clean interface for users.
Building Audio Processing Utilities
Audio processing needs careful handling. I centralize these operations to prevent bugs from inconsistent processing across different parts of the codebase.
Normalization: Making Audio Levels Consistent
User-uploaded voice samples have wildly different volumes. Some people record super quiet, others are basically YELLING into their microphone. Training on inconsistent volumes confuses the model, and generation produces unpredictable loudness that makes your API feel buggy.
Here’s the normalization function with detailed explanation 👇🏾
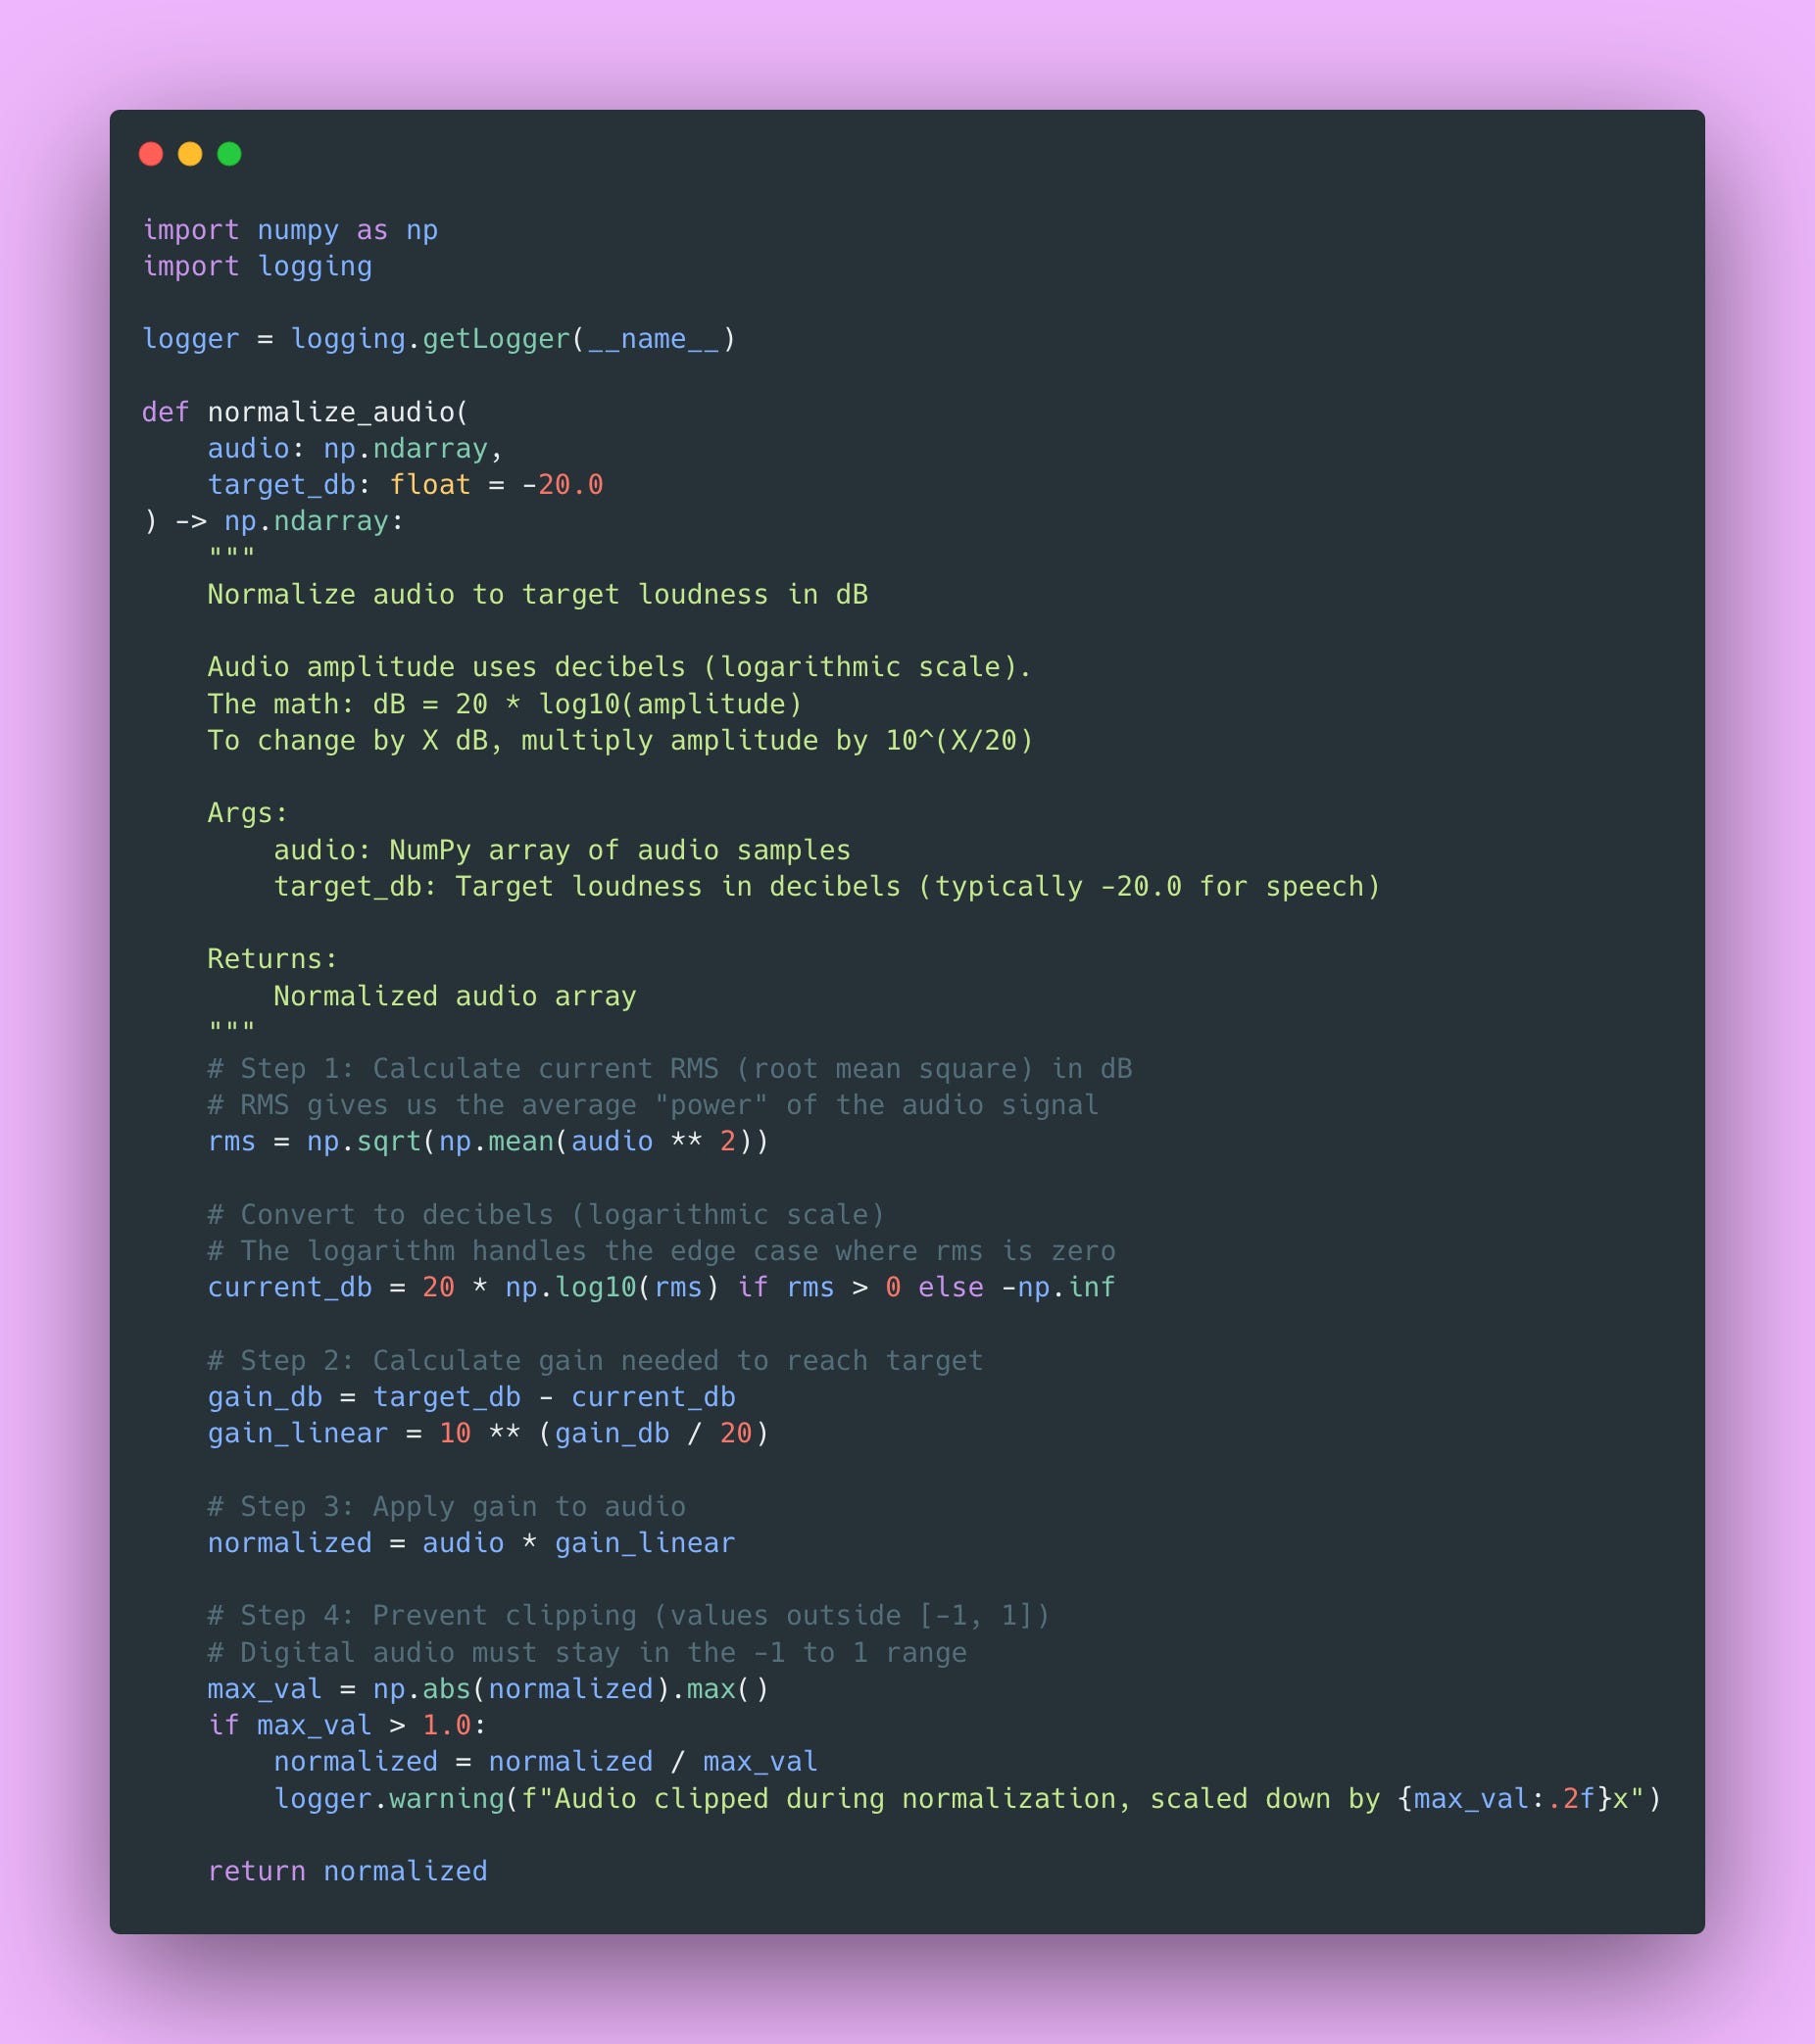
This ensures consistent loudness across all your audio. The math converts between linear amplitude (what the actual samples represent) and logarithmic decibels (how humans perceive loudness). Standard practice for speech is -20dB LUFS (Loudness Units relative to Full Scale).
Why -20dB specifically? It’s loud enough to be clearly heard, but leaves enough headroom that you won’t clip (distort) when processing.
Resample: Getting the Right Sample Rate
Models expect specific sample rates, typically 22.05kHz or 24kHz for XTTS. User uploads might be 44.1kHz (CD quality), 48kHz (video standard), or even 8kHz (phone quality). Mismatched sample rates cause pitch and speed issues.
Trust me, you don’t want your API accidentally generating chipmunk voices because someone uploaded 44.1kHz audio and you didn’t resample 🐿️.
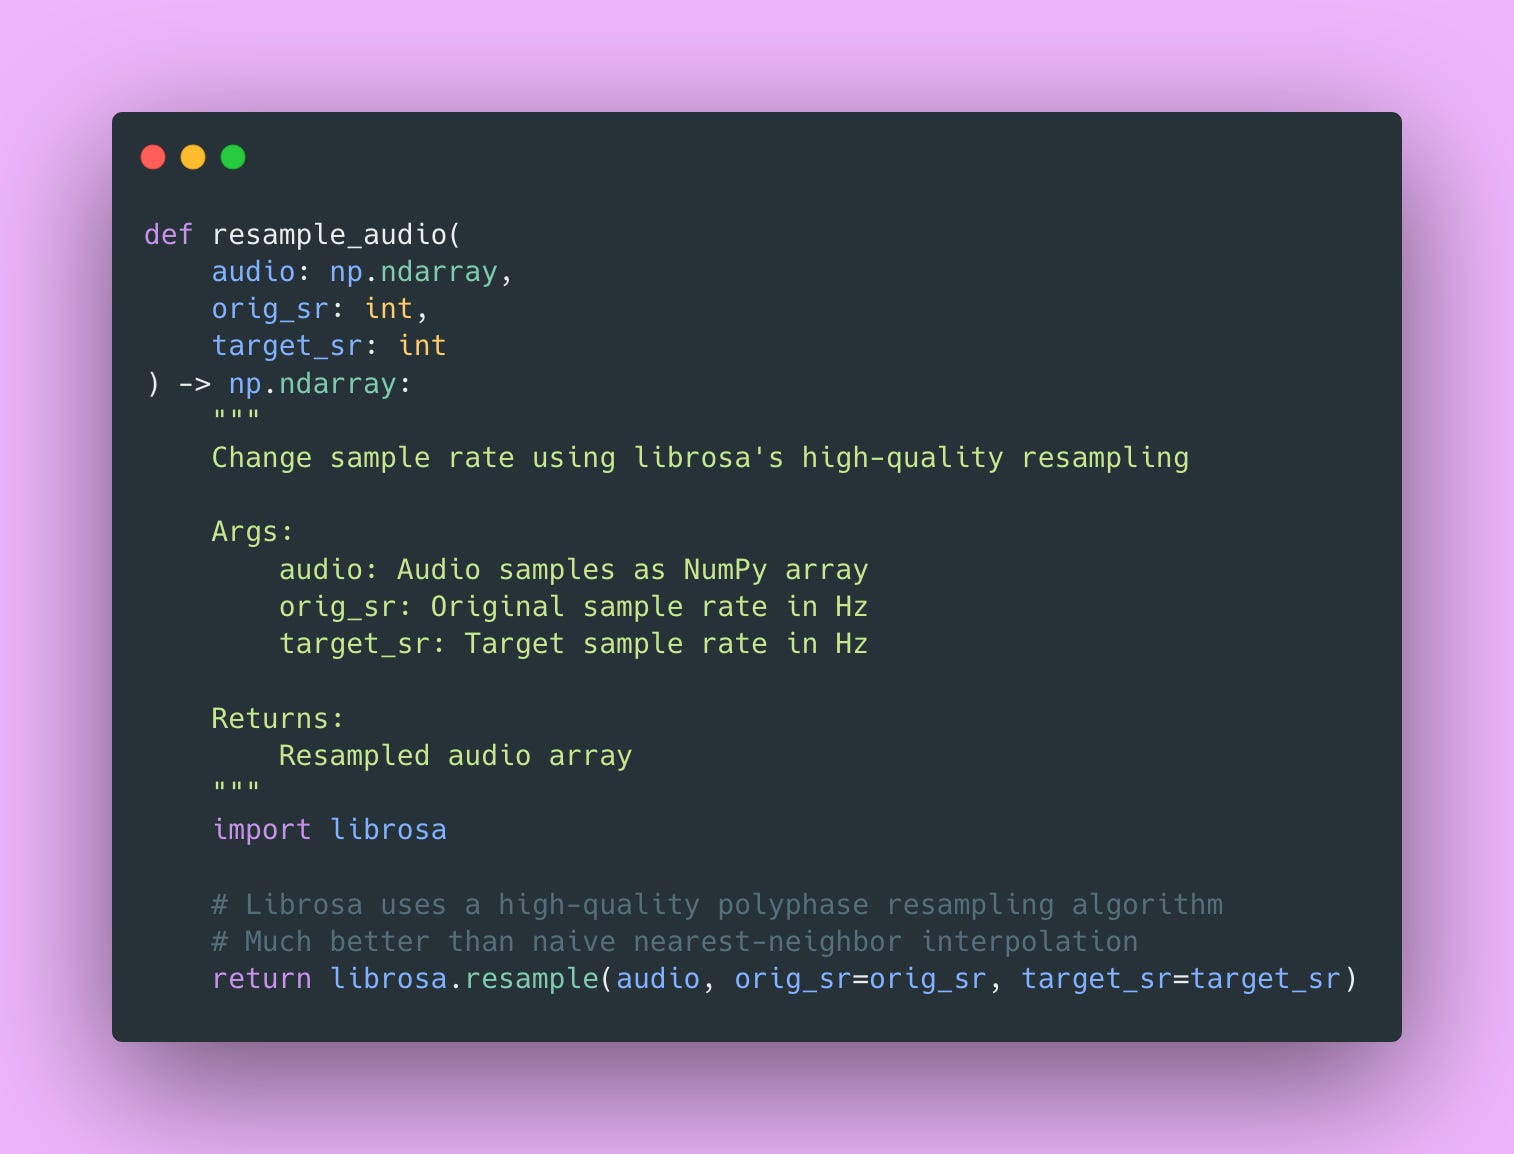
The implementation looks simple, but librosa does the heavy lifting behind the scenes. It uses polyphase filtering, which is a sophisticated resampling algorithm that avoids aliasing.
Format Conversion: Moving Between Formats
Internal processing uses WAV for quality. User delivery uses MP3 for size. Different clients might prefer different formats based on their use case.
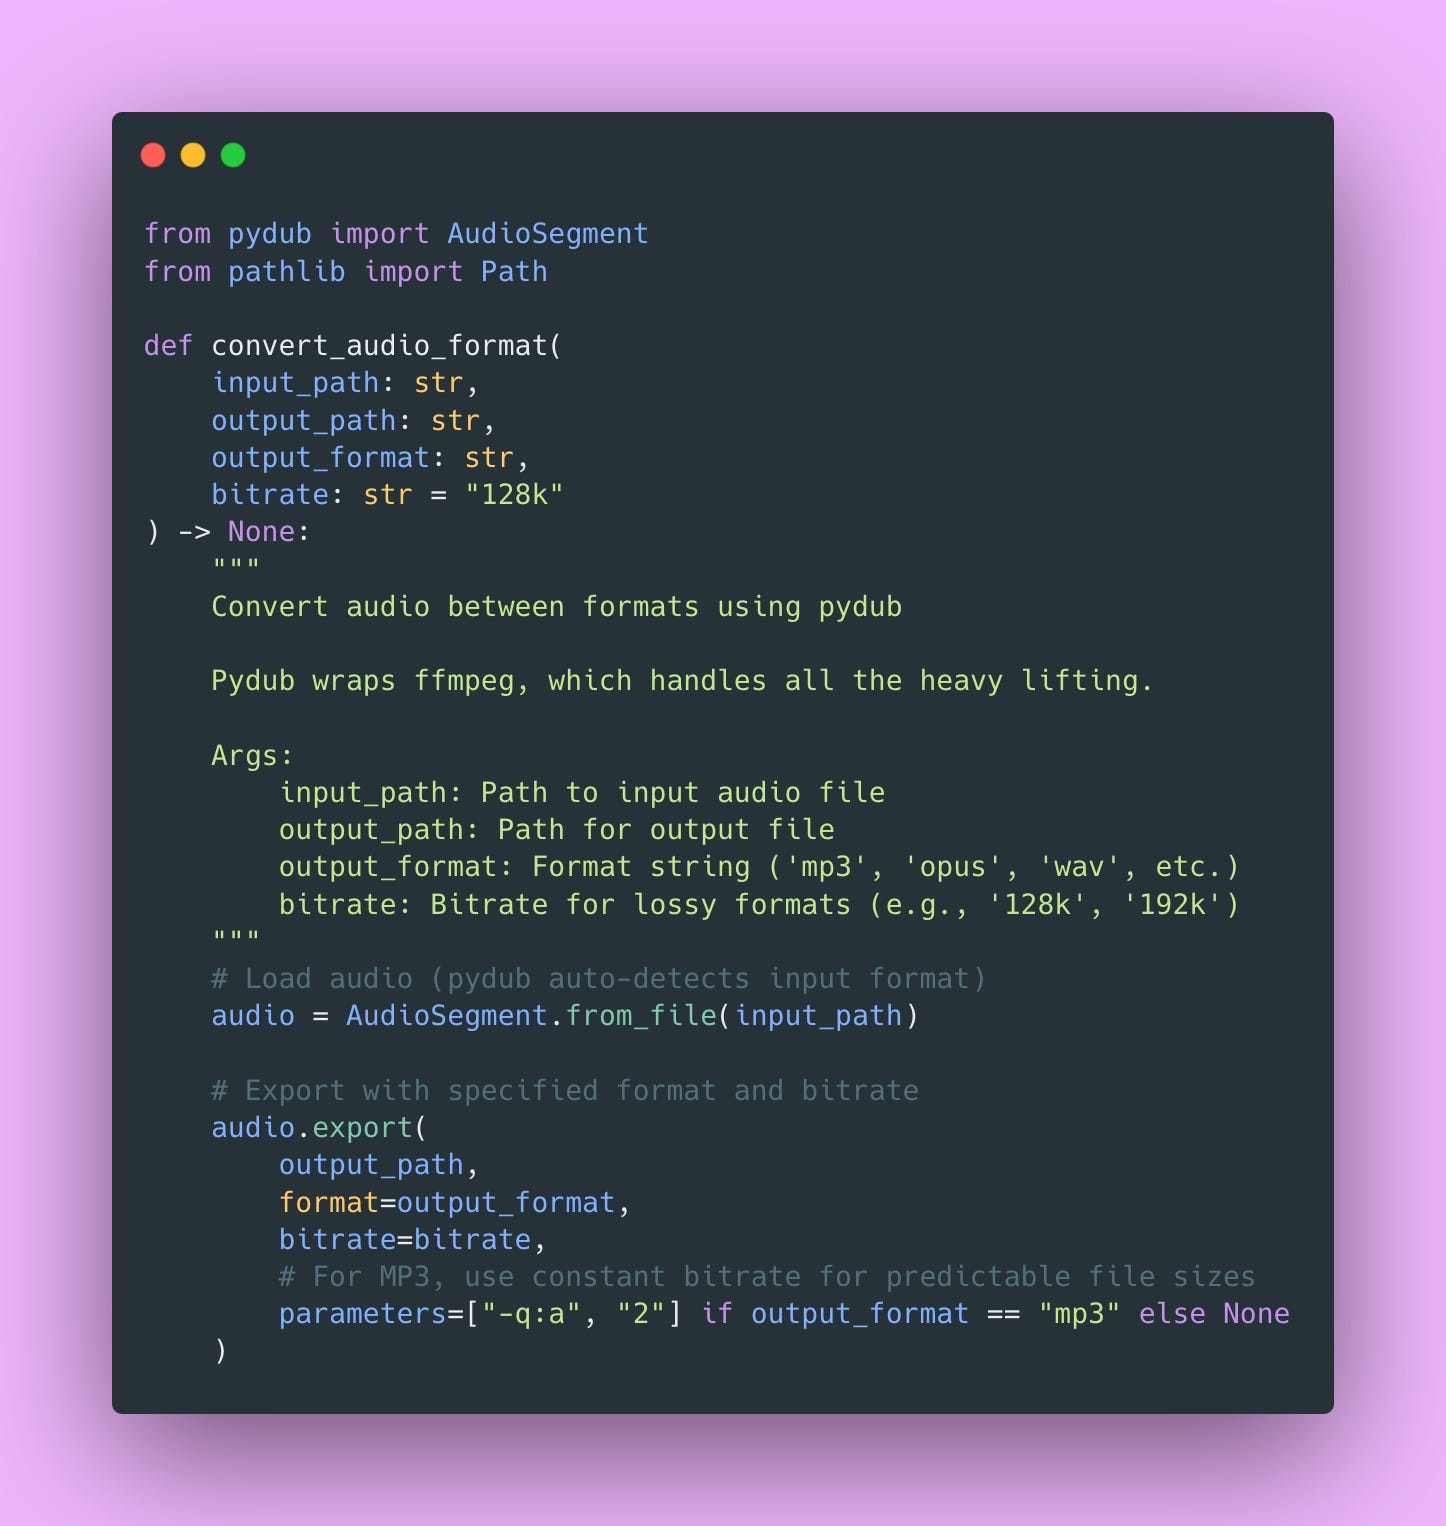
The -q:a 2 parameter for MP3 sets the quality level (0-9, lower is better). I use 2 which provides excellent quality while keeping file sizes reasonable. This is a good balance for most TTS applications.
Building the Model Server
Now for the core of our system, the model server that actually generates speech.
Why Use a Singleton Pattern?
The TTS model is 2GB+ in memory. Loading takes 10-20 seconds (mostly downloading model weights on the first run). Loading multiple copies would quickly exhaust GPU memory. One model instance can efficiently serve all requests.
Here’s the singleton implementation.
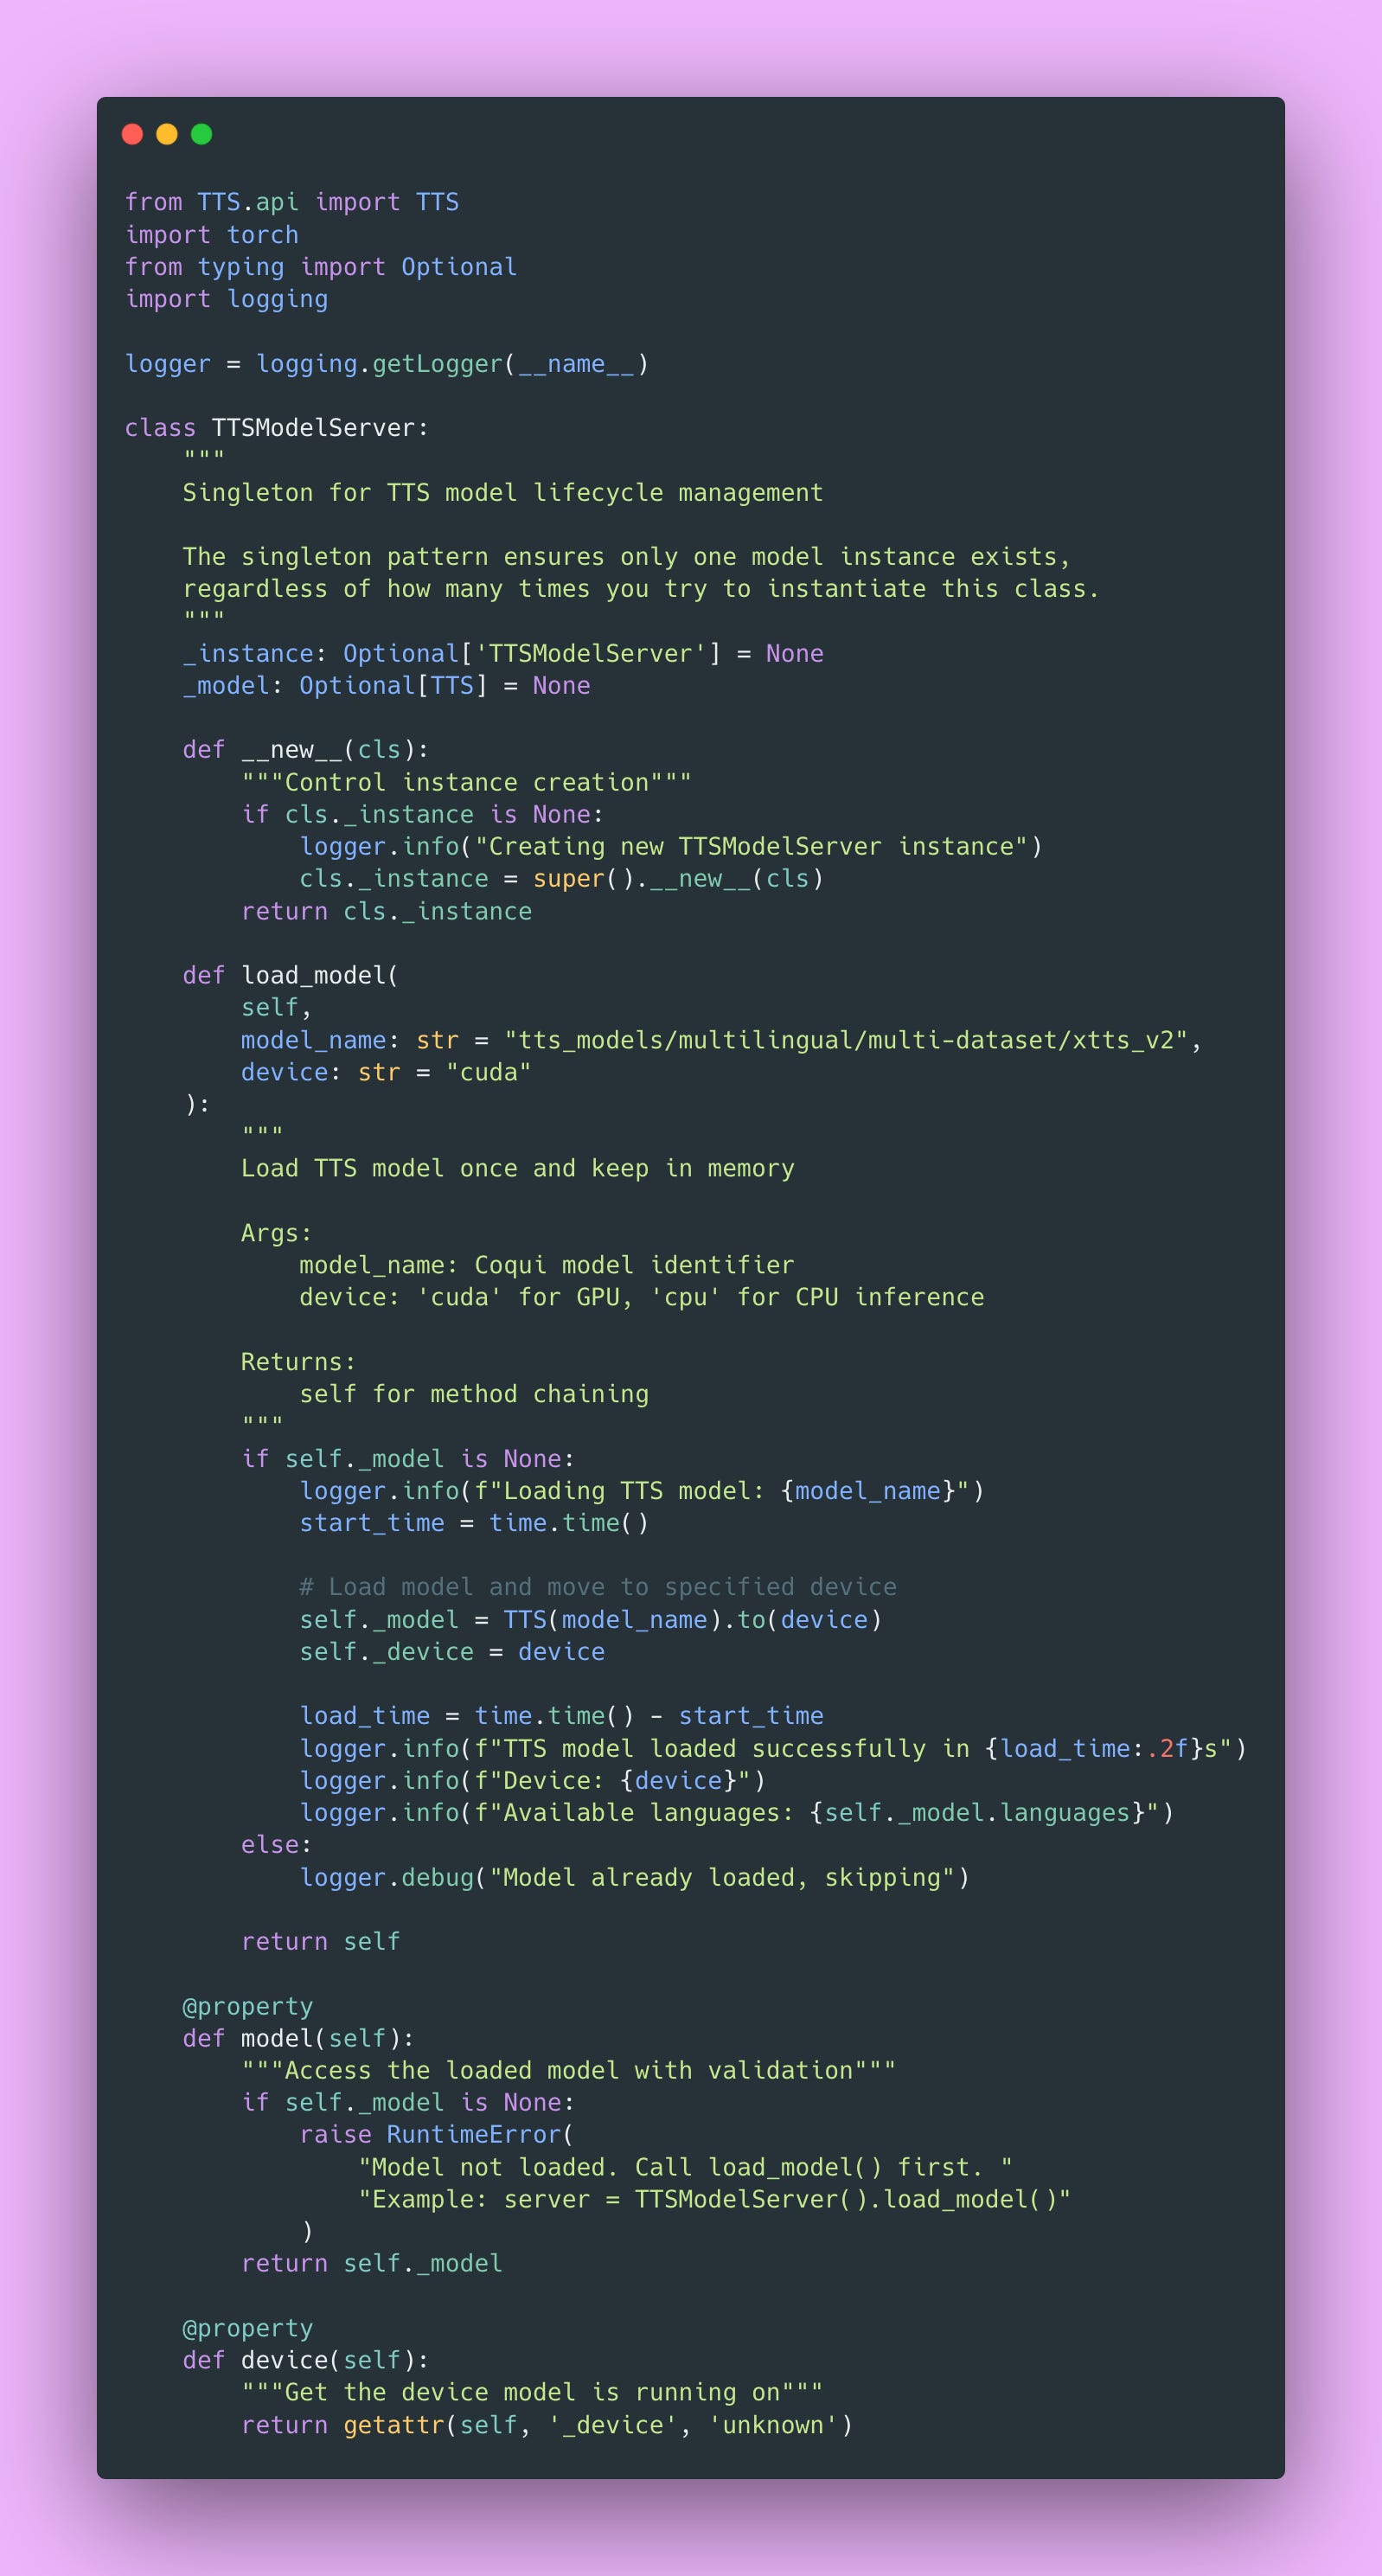
The singleton pattern uses Python’s __new__ method to control instance creation. Every time you call TTSModelServer(), you get the same instance. The model is loaded once on first access and reused for all subsequent requests.
This is a classic creational pattern and works perfectly for resource-heavy models. Plus, the logging helps you debug issues; you’ll know immediately if the model failed to load or if you’re accidentally trying to use it before loading.
How XTTS Actually Works – A Brief Technical Deep-Dive
I think it’s worth understanding what’s happening under the hood, even if you’re not planning to modify the model.
XTTS uses a Transformer-based architecture with a GPT-style autoregressive decoder. The generation process flows like this:
- Text → Phonemes: Text is converted to phonetic representation (like “hello” becomes “h eh l ow”)
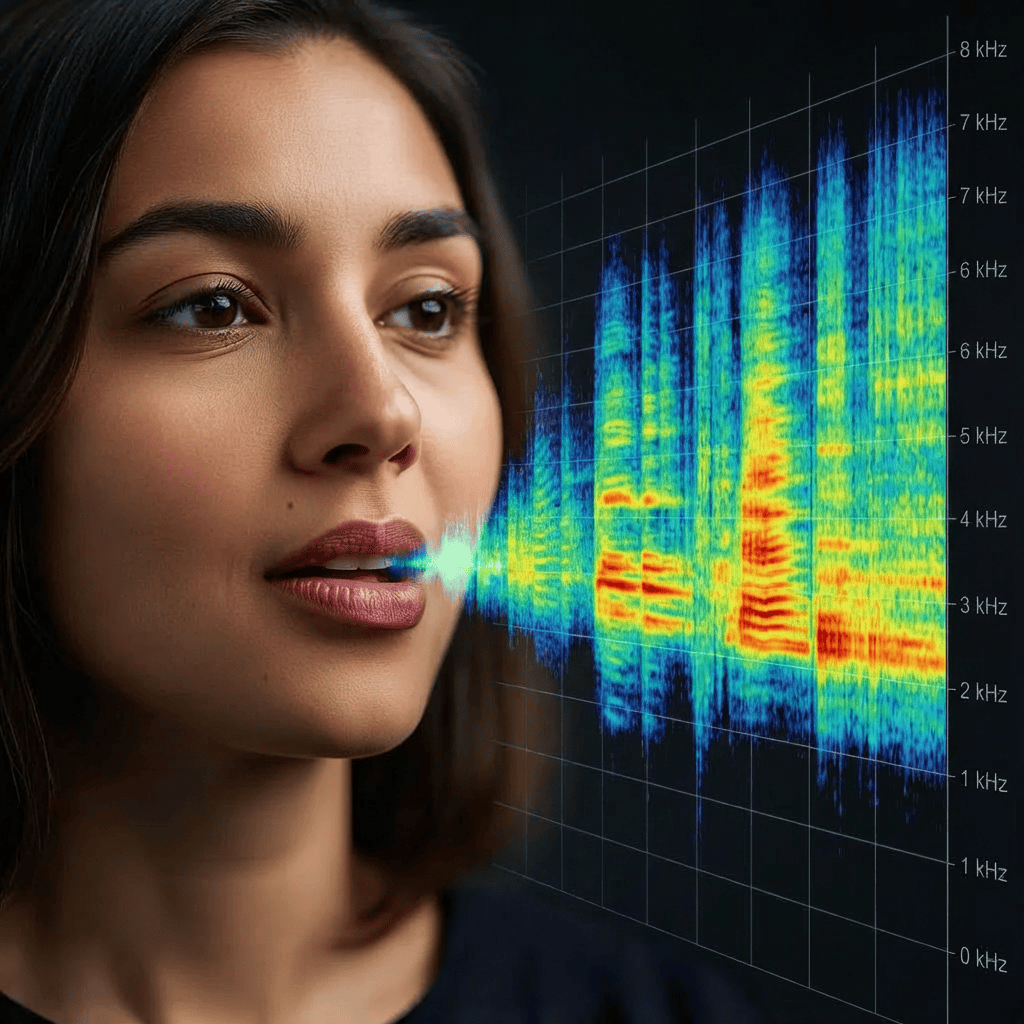
- Phonemes → Acoustic Features: The transformer predicts mel spectrogram frames. A mel spectrogram is a visual representation of sound that shows which frequencies are present over time. Imagine a heat map showing which frequencies appear at what times. It’s basically the blueprint the model uses to understand what the speech should sound like.
- Acoustic Features → Audio: A vocoder (the algorithm that synthesizes the actual sound waves) converts mel spectrograms back into audio you can hear. The vocoder XTTS uses is called HiFi-GAN, which is good at producing natural-sounding speech.
Voice cloning works by encoding a 6-30 second sample into a speaker embedding vector (basically a numerical fingerprint of that voice). Generation then conditions on both the text input and this speaker embedding. The temperature parameter controls randomness in token sampling, just like with GPT models (higher temperature = more variation).
This architecture is why XTTS can clone voices with such short samples compared to older methods that needed hours of training data!
Generating Speech
Here’s the core generation function with comprehensive error handling.
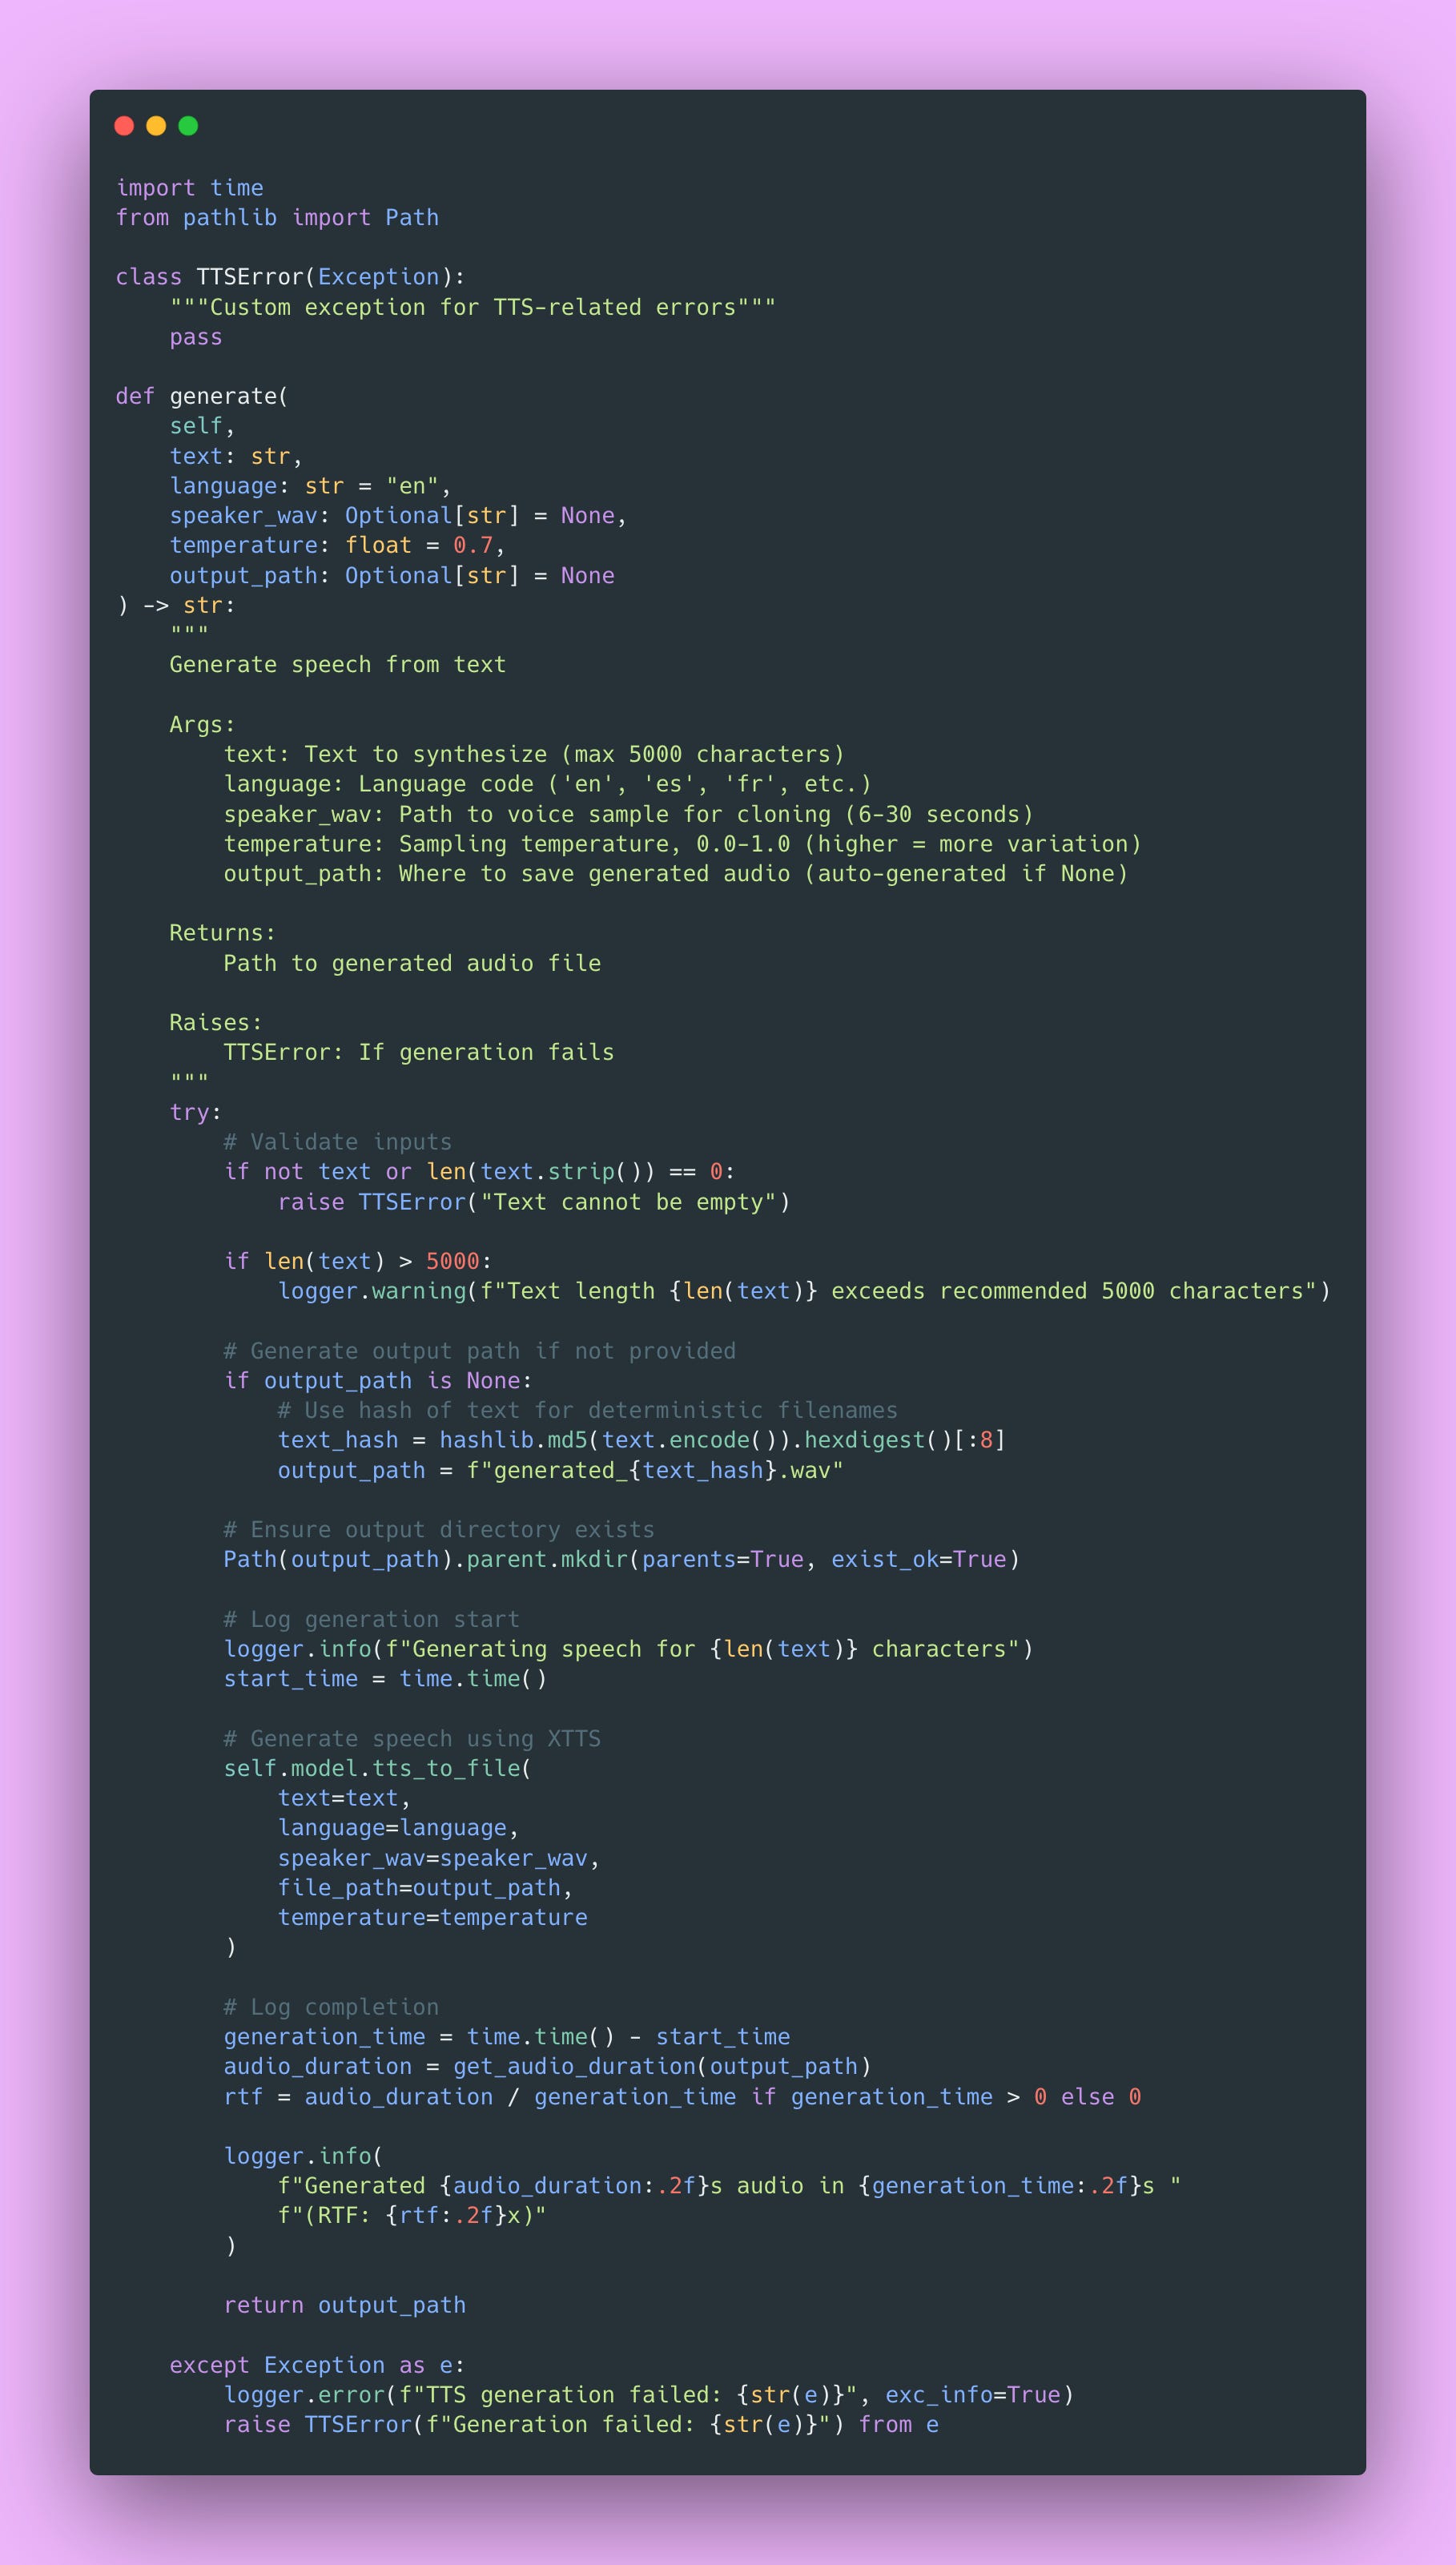
The RTF (Real-Time Factor) metric I log is useful. It tells you if your system can keep up with real-time audio. RTF of 1.0 means it takes 1 second to generate 1 second of audio. RTF of 0.5 means you’re generating 2x faster than real-time (good!). RTF of 2.0 means you’re generating 2x slower than real-time (might be a problem for real-time applications).
Voice Cloning Implementation
Voice cloning is where XTTS really shines. You can clone any voice with just a short sample.
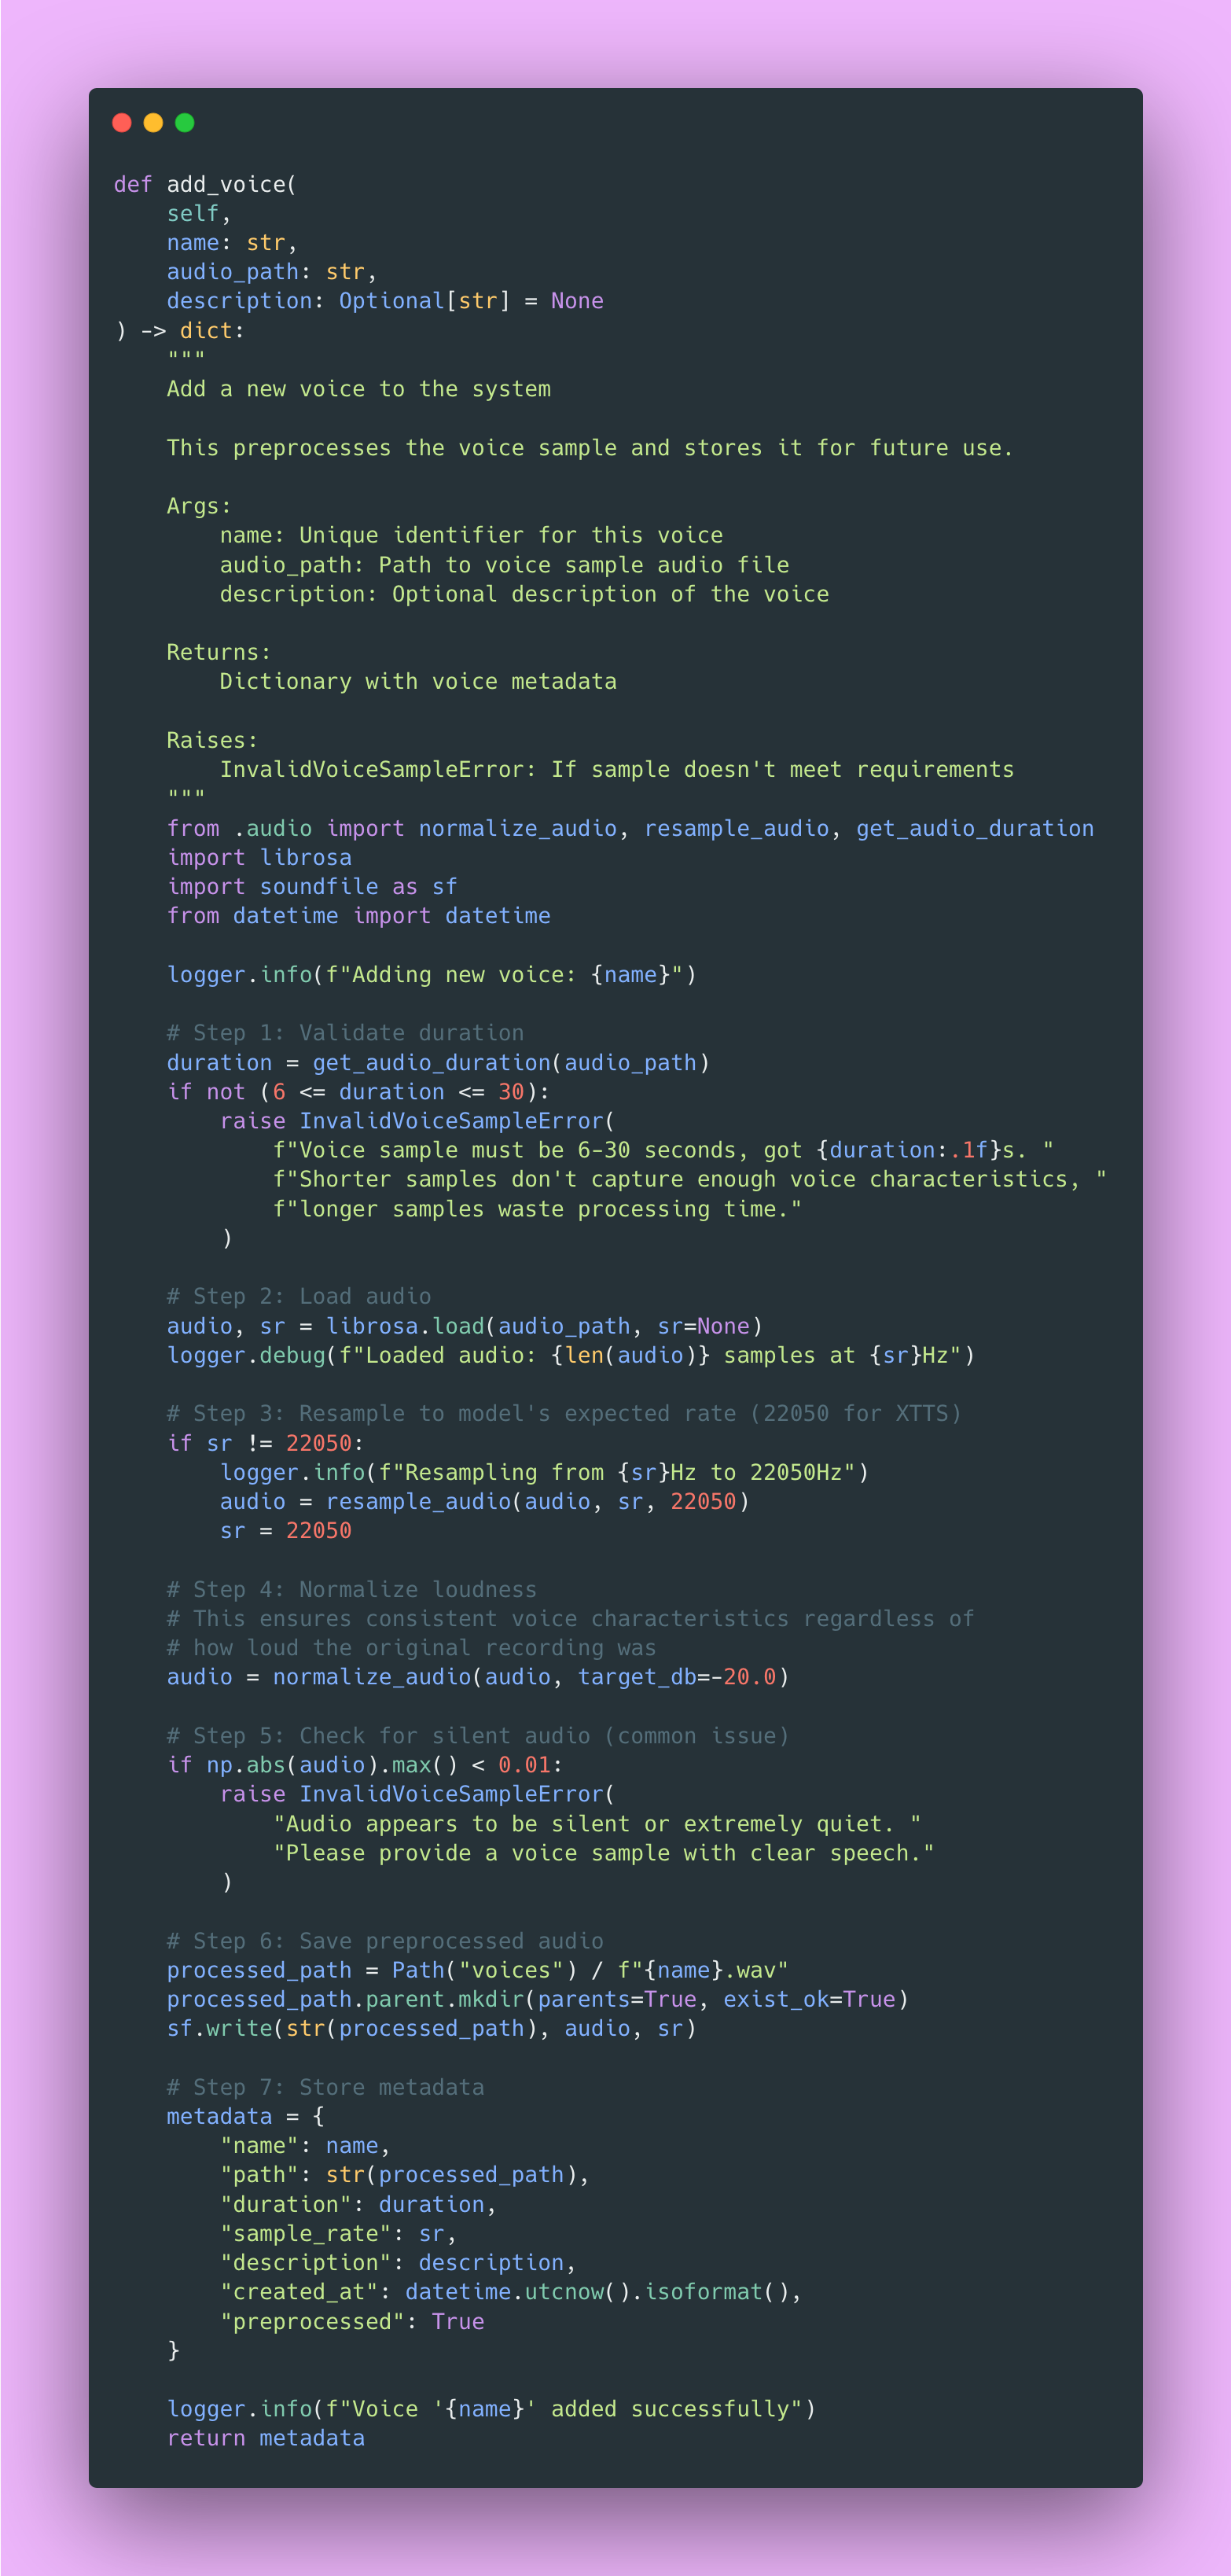
Also, background music or noise degrades quality significantly. I recommend recording in a quiet room or using a sample from a professional podcast with good audio quality.
Storage Management and Caching Strategy
You need to properly organize storage for voice samples and generated audio. File paths, metadata, and cleanup all need careful management. More importantly, caching frequently requested generations can save you tons of compute time and money.
Why Caching Matters So Much
Caching matters more than you might expect for TTS APIs. After analyzing production logs, about 40% of requests were for the same 20 phrases. Things like “Welcome to our service”, “Your order has shipped”, common notification messages that apps send repeatedly.
Each generation takes 1-2 seconds of GPU time. Cache lookup? 10-20ms. That difference adds up fast. Implementing caching dropped GPU utilization by 30%, which meant handling more concurrent users on the same hardware.
Here’s the caching implementation:
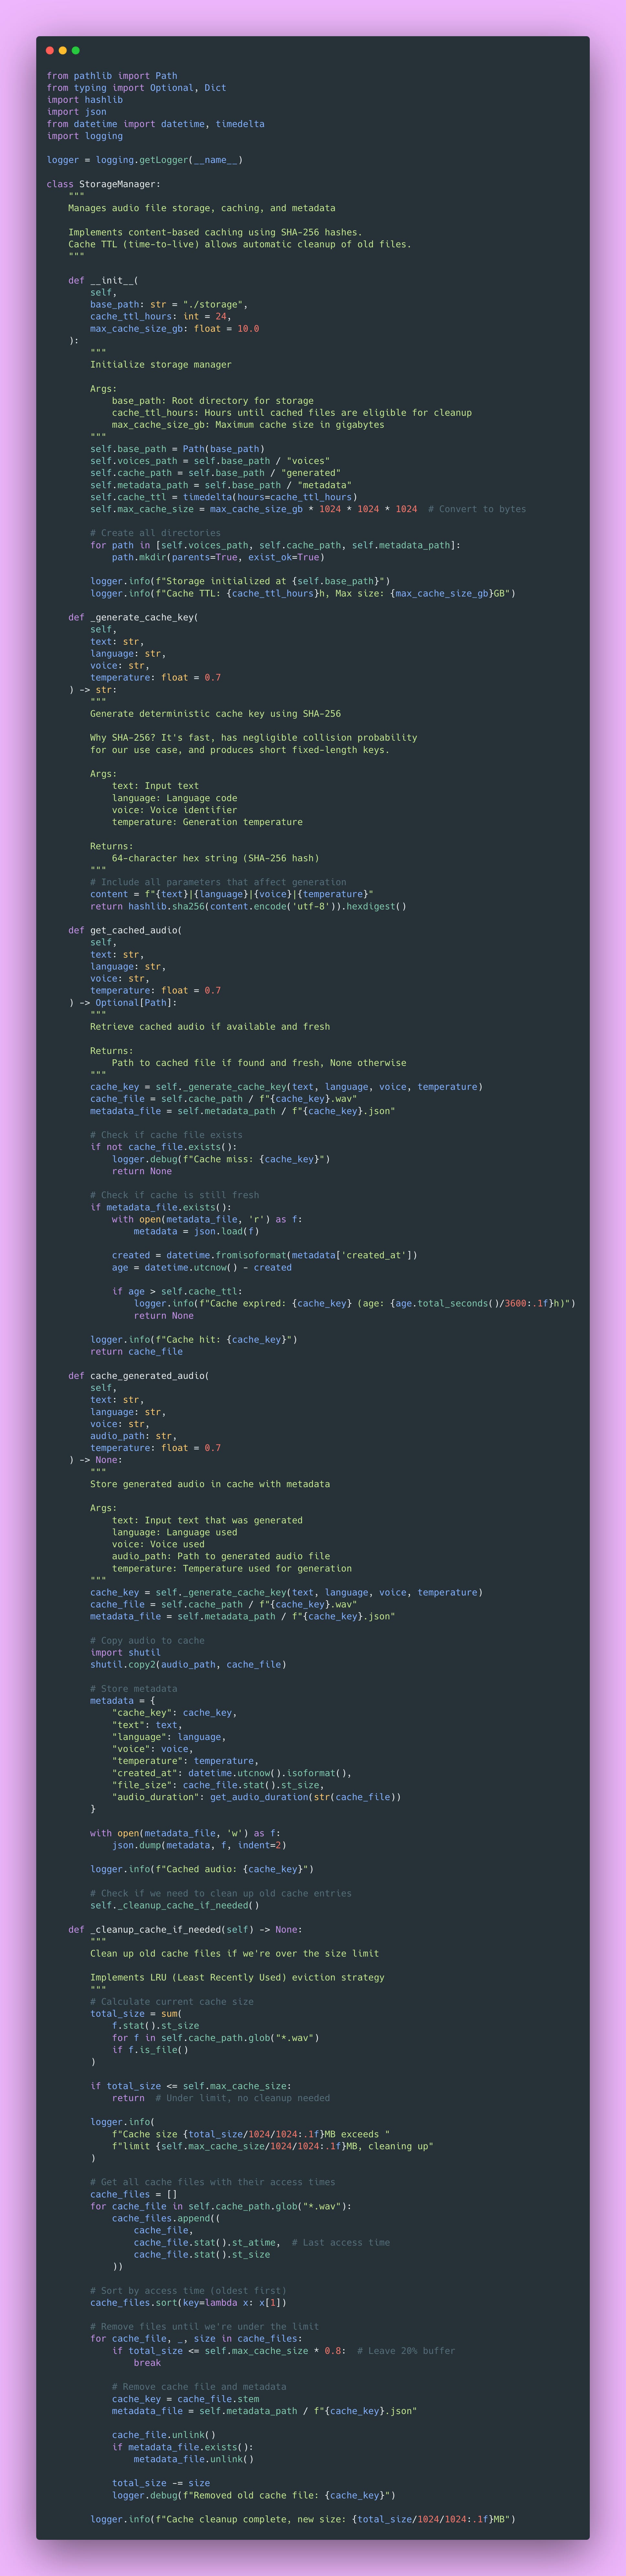
This caching system saved me a fortune in compute costs. The LRU (Least Recently Used) eviction strategy means popular phrases stay cached while rarely-used ones get cleaned up automatically.
Pop Quiz: Why use content-based keys (hashing the input) instead of just incrementing counters? 🤔
Answer: Content-based keys are deterministic! The same input always produces the same key, so we can look up cache hits without maintaining a separate mapping. Plus, it naturally handles duplicate requests without complex deduplication logic.
Validating Requests with Pydantic
Pydantic is amazing for API input validation. It catches bad inputs at the API boundary before they hit your expensive model operations or corrupt your storage layer.
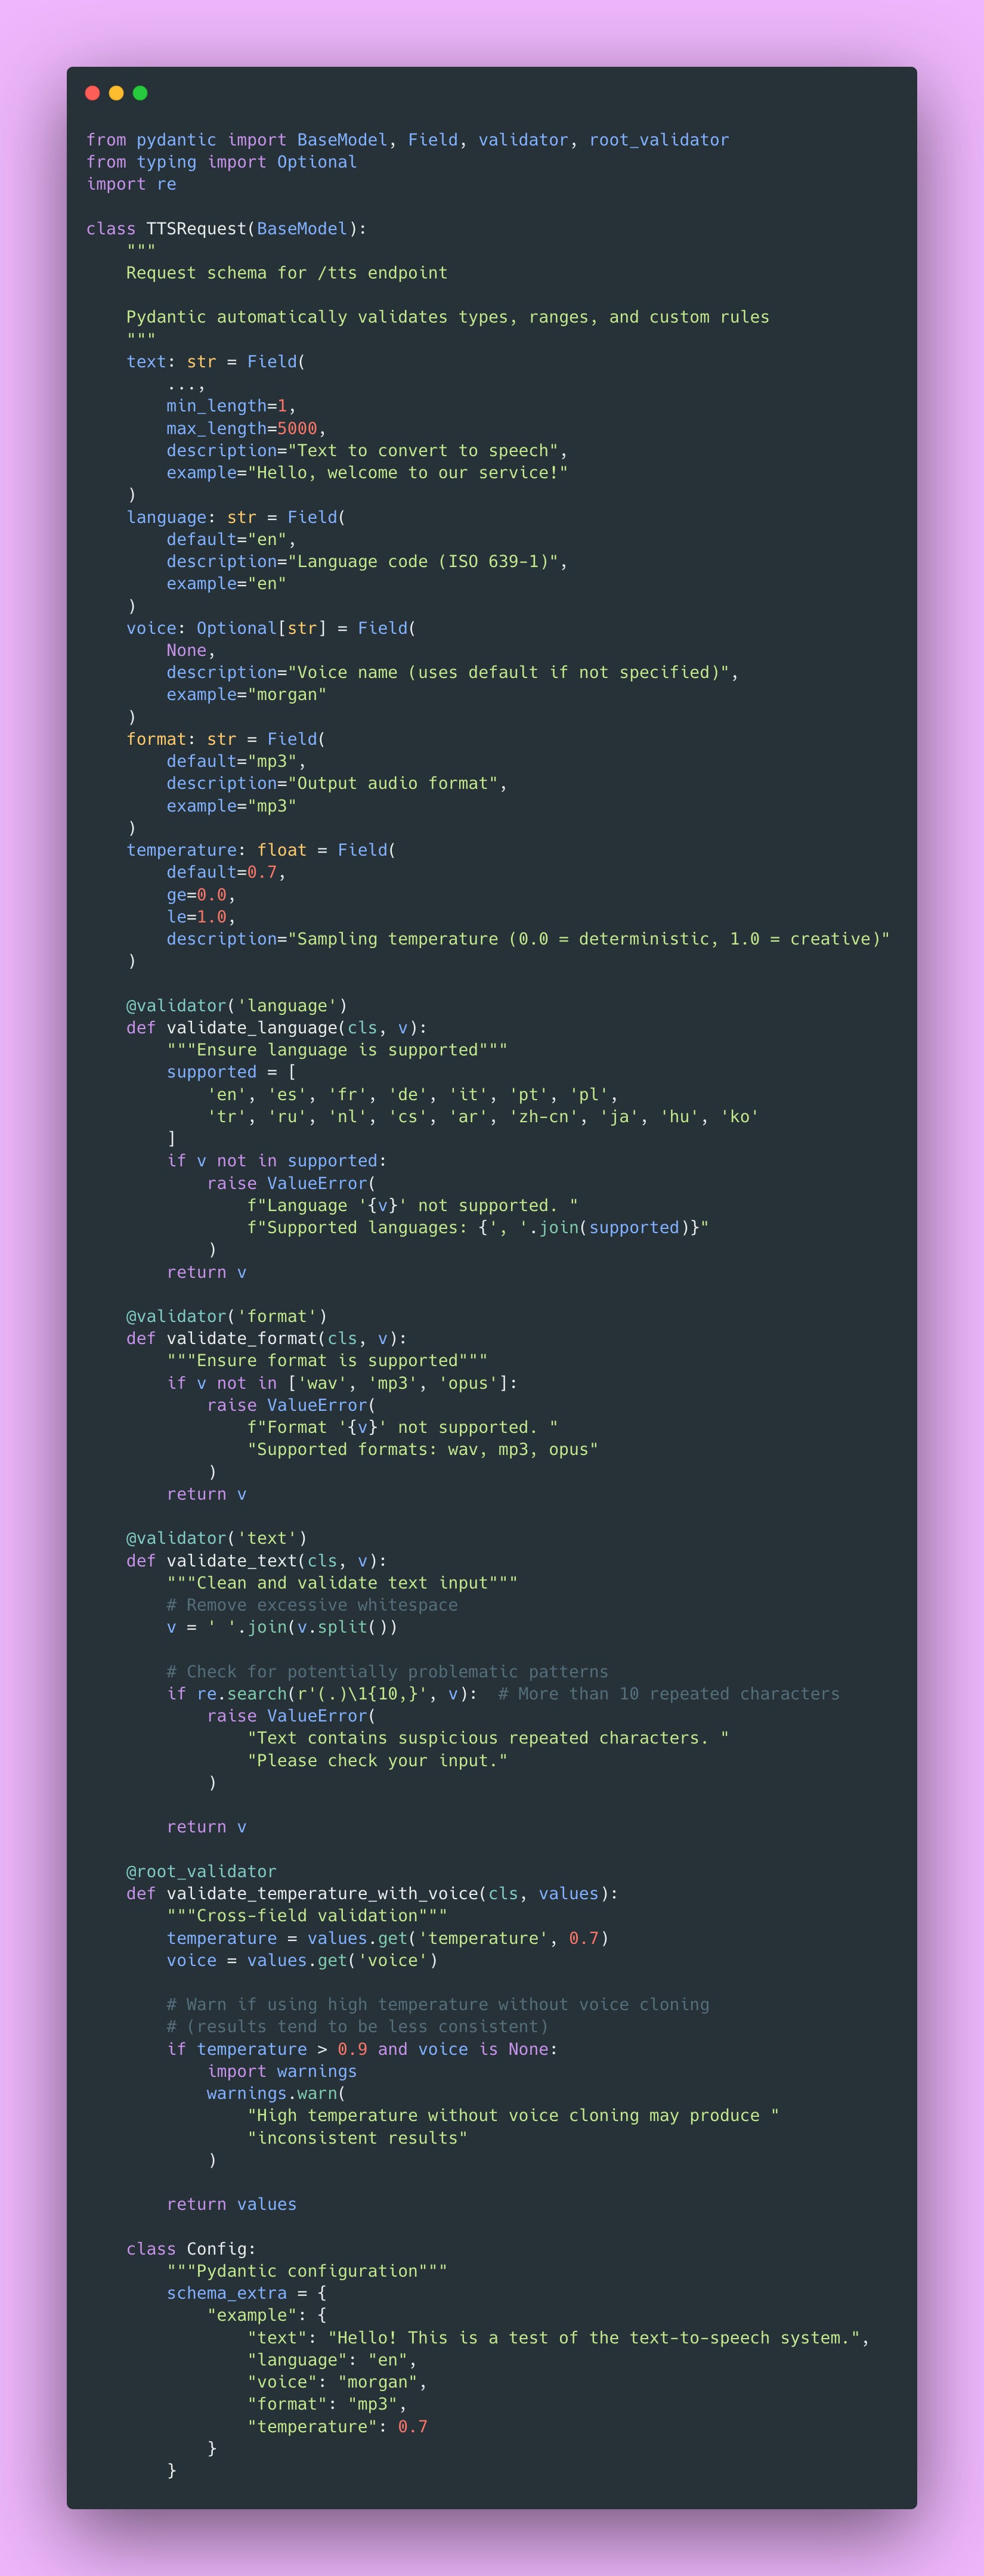
This validation layer has saved me countless debugging hours. Users sometimes send the wildest inputs. Empty strings, 50,000 character novels, random binary data misidentified as text. Pydantic catches all of it before it hits my model.
Building the FastAPI Server
Now for the exciting part, actually serving our TTS model over HTTP! This is where everything comes together.
Streaming Audio Responses
Now we’re cooking 🔥. Audio files can be several megabytes, and users can hear audio while it’s still downloading (progressive playback). This dramatically lowers perceived latency and improves the user experience.
Here’s the implementation.
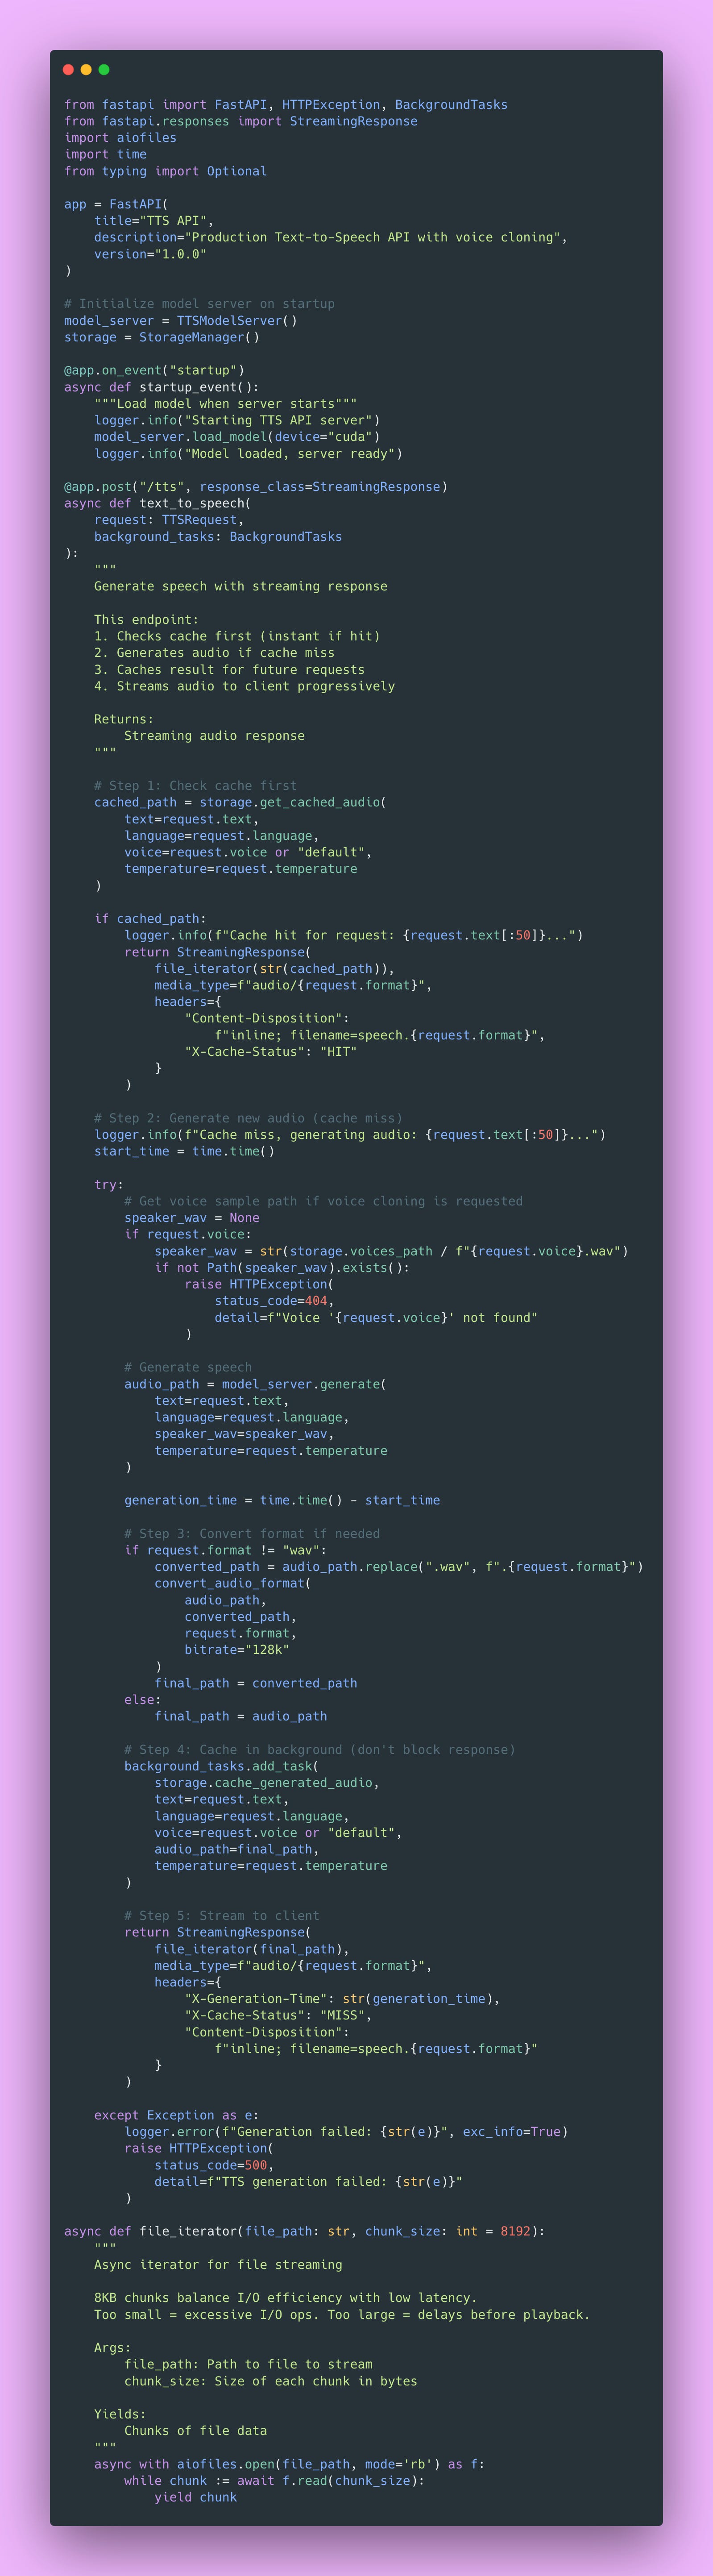
The browser receives the first chunk and begins playback immediately. Audio codecs can decode partial files, so progressive download enables playback during transfer. This is absolutely essential for good UX on slow connections.
Why Async Matters Here
Here’s something I wish someone had explained to me when I first learned async programming:
# Bad: Blocks event loop during I/O
with open(path, ‘rb’) as f:
    data = f.read()  # Blocks entire server - other requests wait!

# Good: Allows other requests to process
async with aiofiles.open(path, ‘rb’) as f:
data = await f.read() # Other requests handled during I/OWith blocking I/O, your entire server pauses while reading the file. If the file read takes 100ms, no other requests can be processed during that time. With async I/O, Python’s event loop can handle other requests while waiting for the disk.
This made a massive difference in my server’s throughput. Before async, I could handle maybe 10 concurrent requests. After implementing async properly, I could handle 50+ concurrent requests on the same hardware.
Voice Upload Endpoint
Users need a way to upload their voice samples for cloning. Here’s how I handle that with proper validation:
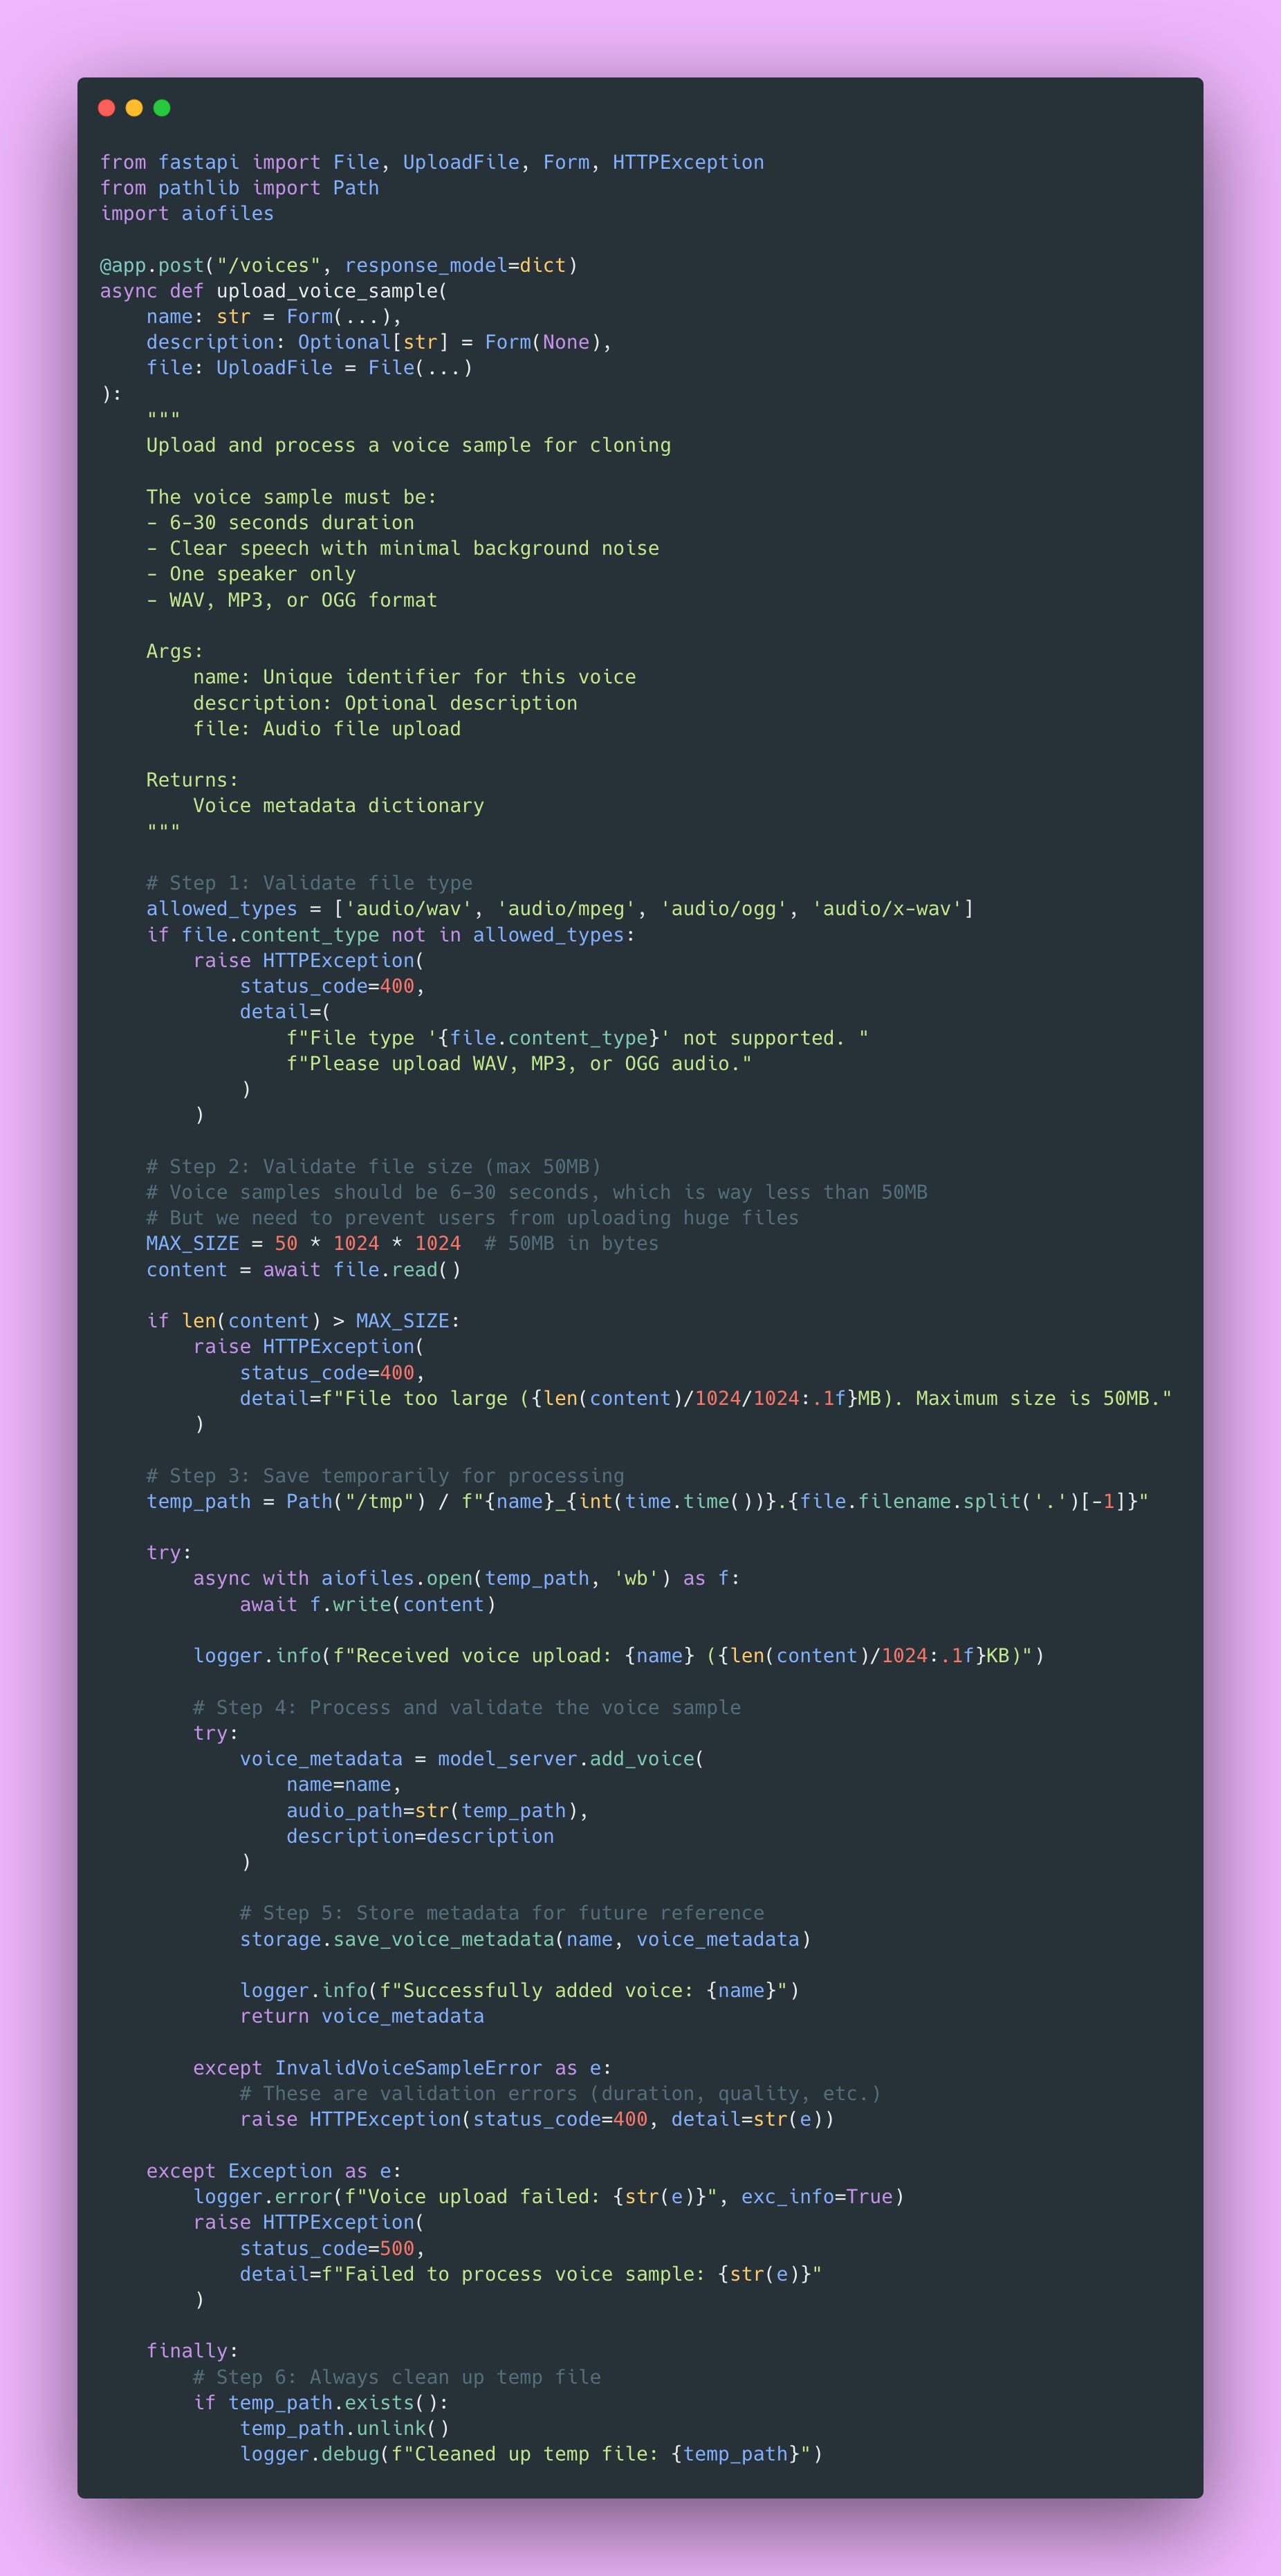
The finally block is critical here. Even if something fails during processing, we clean up the temporary file. Otherwise, failed uploads would fill up your disk over time. Ask me how I know 😏.
Building the Python Client
The client library provides a clean interface for users. It handles all the HTTP details, streaming, retry logic, and provides a Pythonic API that feels natural.
The retry logic with exponential backoff smooths out transient errors. Sometimes servers get temporarily overwhelmed. Instead of failing immediately, the client automatically retries with increasing delays.
Testing Your System
Testing audio systems is different from testing text APIs. String comparison doesn’t work when you’re dealing with binary audio files. You need to verify formats, check durations, validate file sizes, and sometimes manually listen to outputs. Here’s how I structure tests.
Unit Tests for Audio Processing
Integration Tests
Integration tests verify the whole system works together.
What We’ve Built
Let’s take a step back and bask in the glory of our beautiful TTS creation!
We have:
- Model server with singleton pattern – Efficient resource usage, handles model lifecycle
- Audio processing pipeline – Normalization, resampling, format conversion with quality preservation
- File storage and caching – Content-based caching with LRU eviction, saving compute costs
- Voice sample management – Upload, validation, preprocessing for voice cloning
- RESTful API with streaming – Progressive playback, proper error handling, async I/O
- Python client library – Clean API, automatic retries, comprehensive error messages
- Comprehensive testing – Unit tests, integration tests, load tests
The fundamental lessons were efficient resource management, smart caching, streaming delivery, and clean separation of concerns.
Next Steps
In Part 2, I’ll cover production deployment.
We’ll tackle:
- Dockerization: Creating efficient Docker images, multi-stage builds for smaller sizes
- Orchestration: Kubernetes deployment, scaling strategies, load balancing
- CDN integration: Serving cached audio from edge locations for better global performance
- Cost optimization: Reducing GPU costs, efficient batching, spot instances
- Monitoring and alerting: Metrics that matter, detecting quality degradation, performance tracking
- Scaling considerations: Horizontal vs vertical scaling, when to scale up
For now, I encourage you to run this code locally and experiment!
Homework
I recommend you:
- Upload your own voice – Try cloning your voice with a 15-second sample
- Measure cache performance – Generate the same phrase 10 times, compare first vs subsequent requests
- Test different audio formats – Compare MP3 at 128k vs 192k, see if you can hear the difference
- Experiment with text lengths – How does generation time scale with text length?
- Monitor GPU utilization – Run
nvidia-smiwhile generating, watch memory and utilization - Try different voices – Upload multiple voice samples, see how well cloning works
You can also extend this system in many directions.
- Emotion control: Add parameters for controlling emotional tone of speech
- SSML support: Implement Speech Synthesis Markup Language for prosody control
- Multi-speaker conversations: Generate dialogues with different voices
- Real-time streaming: Build WebSocket endpoint for real-time generation as you type
- Audio effects pipeline: Add reverb, echo, pitch shifting for creative applications
- Batch processing: API endpoint that handles hundreds of texts at once efficiently
I could probably create branching posts that go into each of these different avenues.
Regardless, the patterns here transfer to whatever you build next. Whether you’re serving image generation models, video processing pipelines, or any compute-intensive API, you’ll use these same principles: caching for cost savings, streaming for better UX, singleton pattern for resource management, comprehensive testing, and async I/O for scalability.
I hope this guide gave you both the technical knowledge and practical insights to build your own production TTS system! Feel free to reach me on LinkedIn or at cynthia@cynscode.com.
Happy coding 👍🏾